Forza Horizon 6 Tuning Guide: How to Make Any Car Faster


Tuning is what separates a car that feels alive from one that fights you in every corner. In Forza Horizon 6, the upgrade and tuning systems received meaningful tweaks: tire width finally matters, brakes are actually worth upgrading, and a new Mechanical Balance stat gives you a single number to tune toward.
This guide walks you through the 9-step tuning order, every key parameter, a symptom-to-fix diagnosis matrix, and three discipline-specific baselines (race, drift, drag). You can apply it to any car in the game, from a stock hatchback to a maxed-out Hypercar.
Key Takeaways
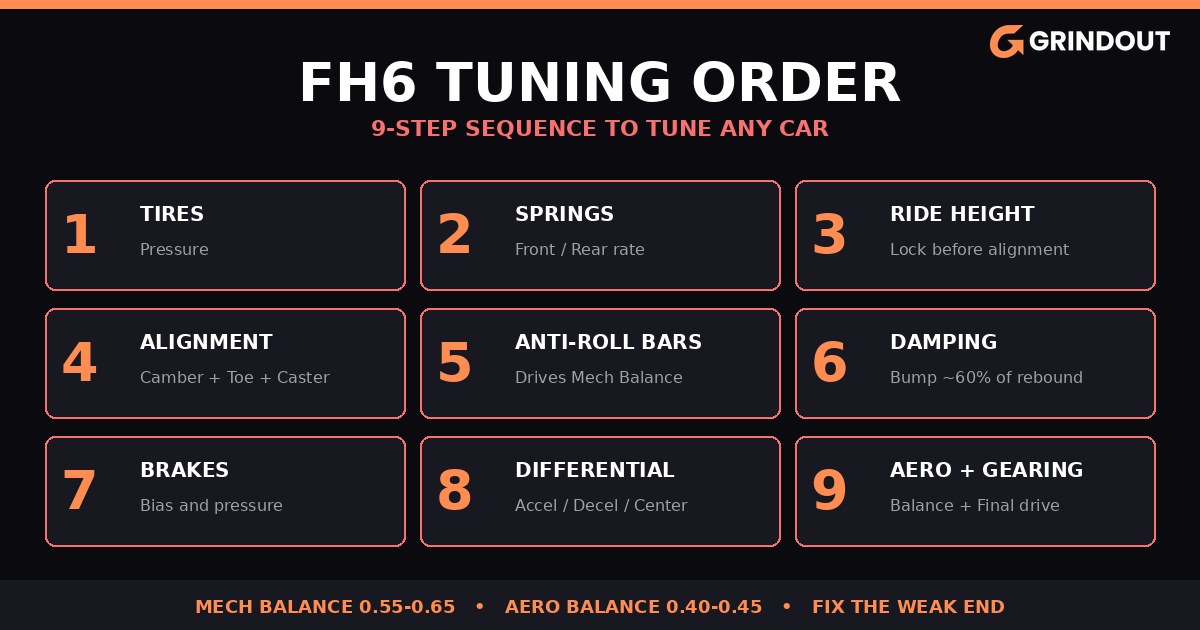
- Tune in this exact order: tires → springs → ride height → alignment → ARBs → damping → brakes → differential → aero → gearing.
- Use Mechanical Balance as your hook: aim for the 0.55–0.65 window, sweet spot around 0.60.
- Fix the end with the problem. Soften the weak end, don't stiffen the strong one.
- Change one thing at a time. Two changes means you don't know which one worked.
- Build before you tune. Tire width upgrades, brake upgrades, and weight reduction now move the needle more than aero alone.
- Aero Balance target: set the front/rear downforce to land in the 0.40–0.45 window, then dial overall level.
- Drift is its own discipline. Different build path, different mindset, sometimes even different tire compounds.
How Tuning Works in Forza Horizon 6
Tuning is the process of identifying a problem the car has, then adjusting the smallest set of sliders that solves it. The goal is not to chase magic numbers, but to make the car behave the way you want it to in the corner phase where it currently fails you.
Grip, Understeer and Oversteer
Everything the car does (turning, accelerating, braking) comes from the tire contact patch. More patch, evenly loaded, equals more grip. Almost every tuning slider exists to shape that patch in the situation you care about.
A car can lose grip in two ways. Understeer is when the front tires let go first and the car pushes wide. Oversteer is when the rear tires let go first and the back end swings out. The whole game is balancing front grip against rear grip across the four corner phases: braking, turn-in, mid-corner, exit.
The 5 Golden Rules
- Fix the end with the problem. Soften the weak end, don't stiffen the strong end.
- Change one thing, test, repeat. Two changes at once means you have no idea which one worked.
- Diagnose by corner phase first. "The car oversteers on exit" tells you it's a diff or rear suspension problem, not a tire pressure problem.
- Use small steps. Start with the conservative version of any adjustment; double down only if the change didn't move the needle.
- When in doubt, reset. Stacking bad changes makes problems harder to diagnose, not easier.
Pro Tip: tune in Rivals mode when possible. The weather and track conditions are locked, so you isolate the car's behavior instead of guessing what the rain just did to your tires.
IMPROVE YOUR FH6 ADVENTURE NOW!
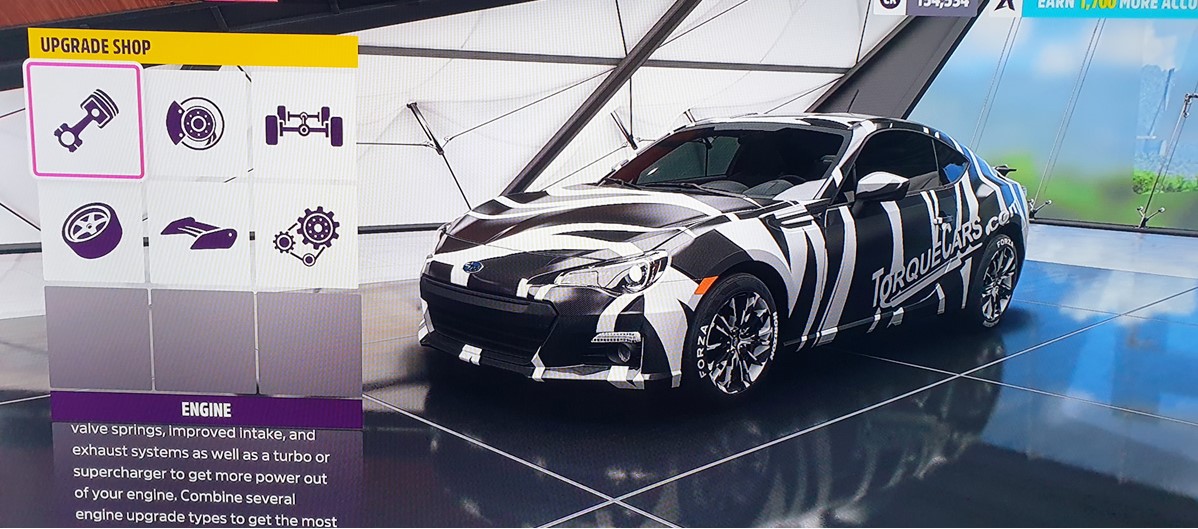
Build Before You Tune
Tuning fixes how a car drives. The build decides what it is capable of in the first place. Skip the build stage and no amount of slider work will compensate.
In the current Forza Horizon 6 meta, three upgrade categories matter more than they used to. Front tire width upgrades now give granular grip adjustment (1–2 notches up is often worth the PI). Brakes are actually valuable now, because bad stock brakes cause lockups on rapid downshifts. Weight reduction should always be maxed out as far as your PI budget allows.
- Tires: leave room for at least one front tire width upgrade.
- Brakes: at least one brake tier above stock in low / mid classes.
- Suspension: race suspension is standard. Rally / off-road suspension only for those disciplines.
- Anti-roll bars: always install both front and rear.
- Differential: always install an aftermarket diff (race, rally, off-road, or drift depending on use case).
- Weight reduction: burn as much PI as you can here. Stability and turn-in come from a lighter chassis.
- Power: fill out the remaining PI budget with engine upgrades.
If you don't have the car you want yet, the fastest path is the Forza Horizon 6 cars boost service so you can start tuning your dream build today. If you're short on credits to fund engine swaps and upgrades, the Forza Horizon 6 credits boost covers the spend side.
The Best Tuning Order
Why Order Matters
Each tuning step assumes the previous ones are done. You can't sensibly tune dampers before springs, because dampers need to match the spring rates. You can't tune camber before ride height, because lowering the car changes the camber values. Following a fixed order means you tune each parameter once, not twice.
The 9-Step Sequence
| # | Step | What You Set | Why It Comes Here |
| 1 | Tires | Pressure | Sets the contact patch baseline everything else builds on. |
| 2 | Springs | Spring rate front / rear | Roughly matches weight distribution. Stiffer end loses grip first. |
| 3 | Ride Height | Front / rear ride height | Lock this BEFORE alignment, or you'll tune camber twice. |
| 4 | Alignment | Camber, toe, caster | Camber values shift with ride height, so it locks here. |
| 5 | Anti-Roll Bars | ARB stiffness front / rear | Your primary mid-corner balance tool. Drives Mechanical Balance. |
| 6 | Damping | Bump and rebound front / rear | Derived from spring rates. Bump ≈ 60% of rebound. |
| 7 | Brakes | Bias and pressure | Bias is the fine tool. A single percent makes a noticeable difference. |
| 8 | Differential | Accel / decel / center | Drivetrain-specific. RWD, FWD, AWD each have a different baseline. |
| 9 | Aero + Gearing | Downforce balance, final drive | Last because they depend on the rest of the chassis being correct. |
Note: this is the early Forza Horizon 6 tuning meta. As the community keeps testing, individual baseline numbers will move. The order itself is stable across game generations.
BUY THE BEST FH6 CARS NOW!
Tires, Pressure and Alignment
Tire Pressure Starting Points
Tire pressure controls the shape of the contact patch. Lower pressure spreads the patch and gives more grip, at the cost of slower steering response. Higher pressure makes the car quicker and sharper, at the cost of cornering grip. Start matched front and rear, then bias-tune later if a problem shows up.
| Compound / Discipline | Front (PSI) | Rear (PSI) | Note |
| Stock / Street / Rally | 26–28 | 26–28 | Default for low and mid PI builds. |
| Sport | ~28 | ~28 | Mid-class baseline. |
| Semi / Race Slicks | ~32 | ~32 | Stiffer sidewalls need more air to keep patch shape. |
| Drift compound | ~32 | variable (low to high) | Two schools of thought below. Test both. |
| Drag | Max | Min | Front high to reduce rolling resistance, rear low for launch grip. |
High Performance, Race Car, Race Truck, Prototype, and GP cars tend to want about +0.5 PSI on top of the table above, because their higher cornering loads need more pressure to keep the patch flat.
Tire Compounds and Width
Tire compound is your maximum grip ceiling. Race slicks beat sport, sport beats street, street beats stock. Off-road and rally compounds trade asphalt grip for dirt grip. Drift compound trades grip for predictable slip. Snow trades almost everything for almost nothing.
Pro Tip: front tire width upgrades are now meaningfully valuable. Adding 1–2 width notches to the front often beats jumping a full compound class on PI cost. Always leave PI budget for at least one front width upgrade on a handling build.
Heavier and older cars want stickier compounds to keep up on tighter tracks. Lighter, modern cars can stay on lower-grade tires longer. Front-wheel-drive builds tend to need an extra tire tier compared to rear-drive at the same PI, because the front tires do both steering and traction work.
Camber, Toe and Caster
Negative camber pre-tilts the tires inward so they sit flat on the road when the car rolls in a corner. Maximum corner grip, minor cost to braking and acceleration grip. Start at -1.0 to -1.5° front and rear; add 0.3° more negative at a time if turn-in is fine but corner grip is short. If you need more than -2.0° front, raise caster instead.
Toe changes are tiny. Front toe-out sharpens turn-in. Rear toe-in stabilises high-power RWD on throttle. Any non-zero toe scrubs the tires on straights and costs top speed, so use it sparingly.
- Caster start: 6.5–7.0° on most cars. Lighter cars can drop to 5–6° if 7 feels twitchy.
- RWD camber: slightly more negative front than rear.
- FWD camber: slightly more negative rear than front.
- AWD camber: balanced front and rear.
- Open-wheel cars: drop rear camber by ~1.0° below the table value. They have inherent understeer and need more rear grip.
Suspension, Ride Height and Mechanical Balance
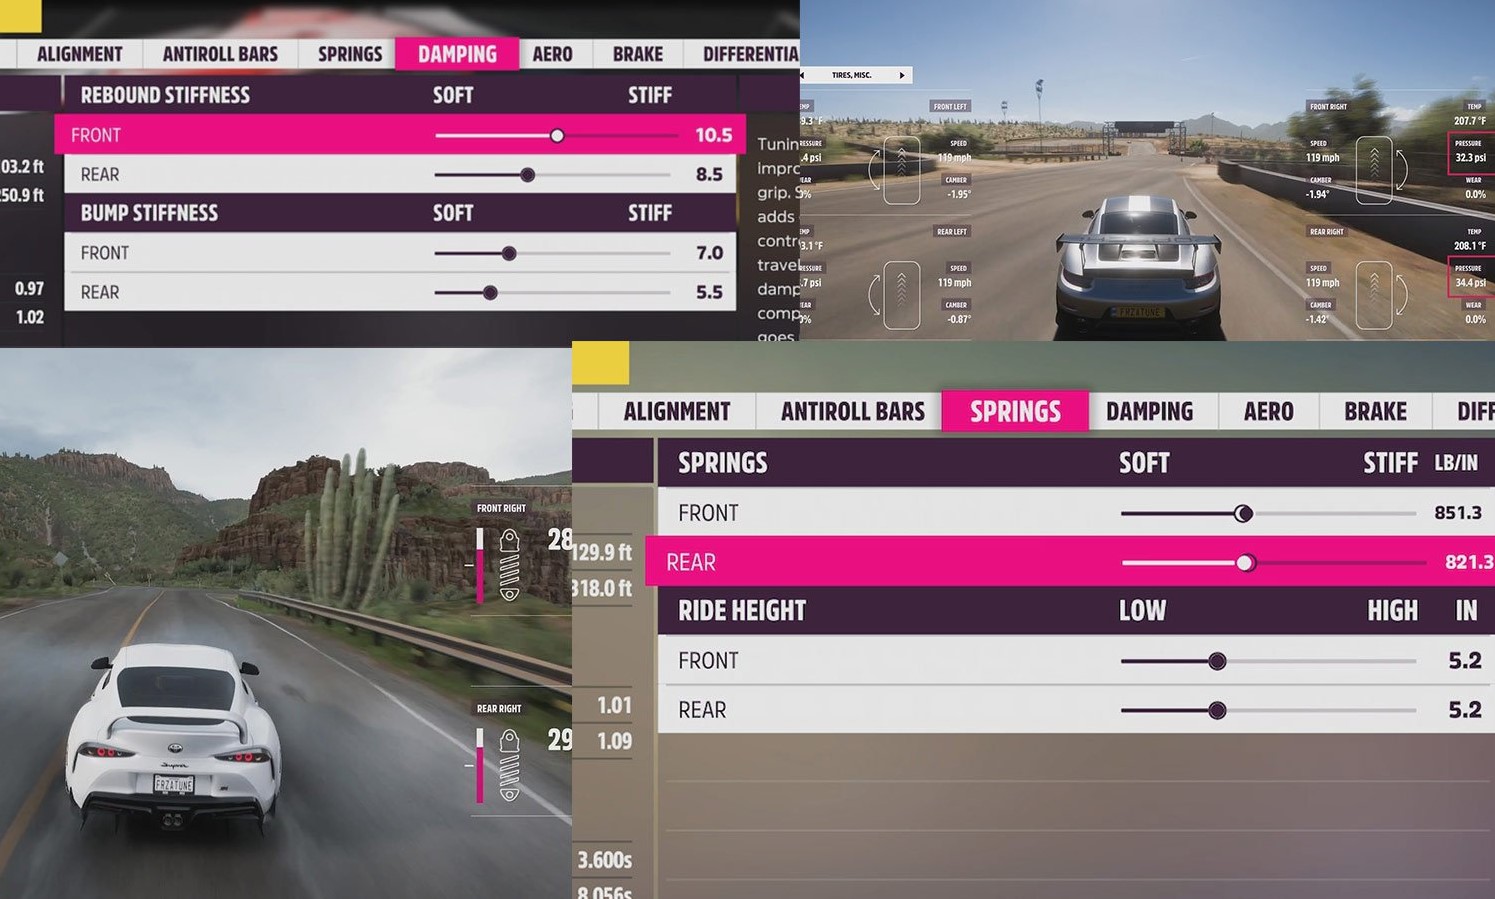
Springs and Ride Height
Springs keep the tire in contact with the road through bumps and weight transfer. Softer springs absorb bumps and keep the tire planted, at the cost of more body roll. Stiffer springs reduce body roll and prevent bottoming out, at the cost of skating over rough surfaces.
The end with the stiffer springs loses grip first. Match spring rate roughly to weight distribution: the heavier end gets stiffer springs. In current FH6 testing, balanced setups with mildly soft overall stiffness are winning over the old front-soft / rear-stiff pattern, because soft-front + stiff-rear makes turn-in inconsistent under trail-braking.
Ride height is the distance from chassis to ground. Lower is better for handling in principle (lower center of gravity), but it reduces suspension travel and the car will bottom out on rough tracks. Start at the minimum for your car type, front and rear matched. Raise it only if you bottom out repeatedly.
Anti-Roll Bars
An anti-roll bar is a metal bar connecting the left and right wheels on the same axle. It only activates when the car leans in a turn, forcing both sides to move together. The stiffer end loses grip first, because the ARB overloads the outside tire on that axle. Stiffer front ARB equals understeer; stiffer rear ARB equals oversteer.
A solid RWD A-class baseline is 20 front / 55 rear. From there, adjust for car type and weight distribution. Heavier cars want higher numbers across the board. FWD wants stiffer rear (40+ rear) to help rotation. AWD wants less front, more rear if the car is understeering.
FH6 Mechanical Balance Target
The tuning screen now displays a Mechanical Balance stat: a live readout of front-versus-rear mechanical grip. Higher means more front grip relative to rear. This is your single most useful tuning number in Forza Horizon 6, and the recommended workflow is to use ARBs to land in the target window first, then fix everything else.
| Mechanical Balance | What It Means | What To Do |
| Below 0.55 | Likely understeering. Won't corner as fast as it could. | Soften front ARB or stiffen rear ARB until you hit 0.55+. |
| 0.55 – 0.65 | Target window. Sweet spot around 0.60. | Stop ARB tuning. Compensate side effects via springs. |
| Above 0.65 | Likely unstable. Rear loses grip too easily. | Stiffen front ARB or soften rear ARB until you drop back to ~0.60. |
Note: this metric is new to Forza Horizon 6. Treat it as your starting compass, not a final score. A car at 0.60 with sloppy springs can still feel terrible. The balance number tells you the chassis is in the right ballpark; the rest of the tune polishes how it feels.
Damping, Brakes and Aero
Bump and Rebound
Springs control how far the suspension moves. Dampers control how fast. Bump resists compression (wheel moving up); rebound resists extension (wheel moving back down). The universal rule across every reliable source: bump should be 40–70% of rebound, with most cars happiest around 60%.
| Build Type | Rebound (F/R) | Bump (F/R) | Note |
| Race / Grip (universal) | ~14 / ~14 | ~8 / ~8 | Bump 60% of rebound. Match front/rear initially. |
| Race (AWD soft meta) | ~18 / ~18 | ~6 / ~6 | Common baseline in current FH6 testing for fast AWD builds. |
| Drift | ~4 / ~4 | ~4 / ~4 | Very soft both. Easy weight transfer for transitions. |
| Drag (RWD) | Soft front / Stiff rear | Stiff front / Soft rear | Inverts circuit pattern. Keeps rear planted on launch. |
The end with softer damping is the end that rotates more. Softer front rebound equals oversteer on entry; softer rear rebound equals understeer on entry. Use this when the car has a single symptom you can't shake with ARBs alone.
Brake Bias and Pressure
Brake bias is the front/rear split of braking force. More forward bias means more stability and a tendency to understeer under heavy braking. More rearward bias rotates the car under trail-braking but risks the rear stepping out. Use the slider sparingly; a single percent makes a noticeable difference.
Important: the brake bias slider text was fixed in Forza Horizon 6. Moving the slider toward Front now actually adds front bias, the way you'd expect.
| Build | Bias % Front | Pressure % | Use Case |
| Stable Grip (AWD, beginners) | 52–55% | 105–115% | Finish braking before turn-in. |
| Aggressive Grip (RWD track) | 48–51% | 110–120% | Trail-brake into corners. Faster but harder. |
| Touge / Mountain | 50–52% | 100–110% | Mixed-speed corners, predictable rotation. |
| FWD Grip | 55–60% | 100–110% | Reduces lift-off oversteer. |
| Highway / Top Speed | 54–58% | 95–105% | Heavy cars. Safe emergency braking. |
| Drift (tandem) | 55–70% (toward front) | 90–100% | Forward bias lets you brake mid-drift without spinning. |
Leave brake pressure at 100% unless you have a specific lockup issue (drop pressure 5–10%) or feel like the car won't slow down (raise 5–10%). The sweet spot is having tire lockup happen in the last 10–15% of the trigger pull.
Aero Balance
Aero adds downforce at speed, in exchange for top speed and acceleration. Forza Horizon 6 introduced an Aero Balance stat that takes the old "max front, min rear" meta and turns it on its head.
- Set the balance first. Adjust front and rear downforce until the Aero Balance stat reads 0.40–0.45. Higher means more front downforce.
- Set overall level by feel. Time attack and circuit builds end up near max downforce; sprint and speed-focused builds end up much lower.
- Fine-tune by symptom. Add front downforce to fix high-speed understeer; add rear to fix high-speed oversteer. Add only; don't pull from one end to feed the other.
Drivetrain bias as a quick hint: RWD wants a slight rear bias; FWD / AWD want a slight front bias. Very high-power RWD builds need extra rear downforce or they will spin the rears on exit even with the balance stat in range.
Differential and Gearing
Differential by Drivetrain
The differential controls how power splits between the two driven wheels. Acceleration setting locks the diff under throttle; higher equals more traction on exit, more oversteer tendency. Deceleration locks the diff off-throttle; higher equals stable entry, less rotation. Accel only adjusts in 2% increments, so always use even numbers.
| Drivetrain | Front A / D | Rear A / D | Center |
| RWD Race | — | 50–60% / 10–20% | — |
| FWD Race | 80–95% / 5–10% | — | — |
| AWD Race | 80–95% / 5–10% | 50–70% / 10–15% | 70–80% rear |
| AWD Touge | 15–25% / 5–10% | 65–80% / 15–20% | 70–80% rear |
| RWD Drift | — | 95–100% / 10–40% | — |
| Rally / Off-road | baseline + 24% A / −20% D | baseline + 24% A / −20% D | 60–70% rear |
Hard limits: don't push accel above 95% on FWD/AWD (restricts turn-in) and don't drop decel below 5% (causes instability). For AWD, never put the center diff below 50%. Open-wheel cars want a very open diff (accel around 30%, decel 0%) to fight inherent understeer.
Final Drive Starting Points
Final drive is the single multiplier applied to all gears. Most of the time, you only touch the final drive and leave individual ratios at default. The goal is to hit the rev limiter in top gear on the longest straight. Anything less is wasted top speed; anything more and you're bouncing off the limiter before the finish line.
A useful community starting formula ties final drive to power output: FD = 4.25 + ((400 − Power) / 6) × 0.01. Treat it as a starting point, not a hard rule.
- 250 hp: FD ≈ 4.50
- 400 hp: FD = 4.25
- 600 hp: FD ≈ 3.91
- 800+ hp: halve the power input first, then apply the formula. Heavy aero adds another offset (−0.05 to −0.40 depending on level).
- Rally car: +0.50 vs road. Off-road: +0.75. Drag: −0.20. Drift: +0.10.
When to Tune Individual Gears
Most race builds don't need to touch individual ratios. Three cases where you do: drag (tune 1st gear iteratively on the strip), drift (tune your main drift gear so it hits redline without bouncing off the limiter from a dead stop), and very-low or very-high power builds that fall outside the standard race transmission spacing.
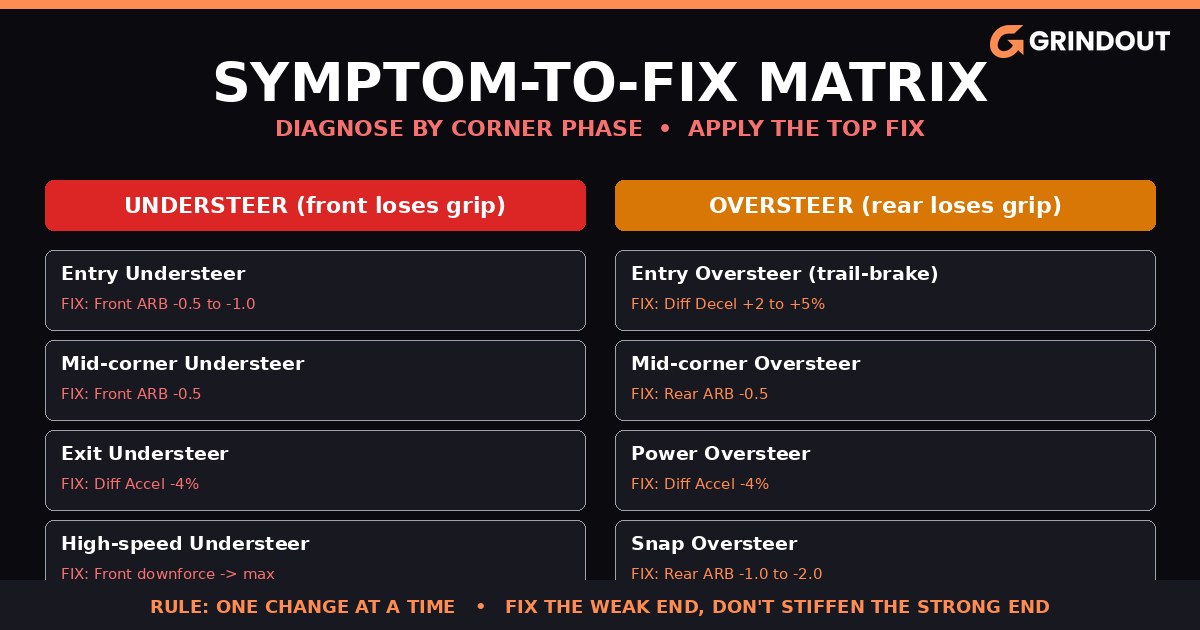
Symptom-to-Fix Diagnosis Matrix
Drive the car. Find the worst single symptom. Look it up below. Apply the top fix in the list. Never apply two fixes at once. Items inside each row are ordered most-effective first.
Understeer Fixes
| Symptom | Phase | Primary Fix | Secondary Fixes |
| Entry Understeer | Braking → turn-in | Front ARB −0.5 to −1.0 | Front spring −5%, front rebound −0.3, brake bias 2% rear, diff decel −2 to −5%, caster +0.5 |
| Mid-corner Understeer | Mid-corner | Front ARB −0.5 | Front tire −0.5 PSI, front camber +0.3 negative, front downforce +10 lb, front ride height −0.1 in |
| Exit Understeer (on throttle) | Exit | Diff accel −4% | Rear spring +5%, rear toe-in toward 0, rear downforce −10 to −15 lb, rear bump +0.2 |
| High-speed Understeer | High-speed corners | Front downforce → max | Front camber +0.5 negative, front ride height −0.1 in, small reduction to rear downforce |
Oversteer Fixes
| Symptom | Phase | Primary Fix | Secondary Fixes |
| Entry Oversteer (lift / trail-brake) | Braking → turn-in | Diff decel +2 to +5% | Rear ARB −0.5, brake bias 1–2% forward, rear spring −5%, front rebound +0.2 |
| Mid-corner Oversteer | Mid-corner | Rear ARB −0.5 | Rear camber +0.3 negative, rear downforce +10 lb, rear ride height −0.1 in |
| Power Oversteer (snap on throttle) | Exit | Diff accel −4% | Rear toe-in −0.1 to −0.2, rear spring −5%, rear bump −0.2, rear downforce +15 lb |
| Snap Oversteer (violent, sudden) | Any phase | Rear ARB −1.0 to −2.0 | Rear spring −10%, rear rebound −0.5, rear bump −0.3, diff accel step down 4–8% |
Other Handling Problems
- Nose dives under braking: front bump +0.3 to +0.5, front spring +5%, brake pressure −5%.
- Bouncy / floaty: bump both axles +0.2, rebound both +0.2, springs +5% if still loose.
- Skitters over bumps and curbs: bump damping −0.3, springs −5%, ARBs −0.5 each, ride height +0.1 in.
- Bottoms out / scrapes: ride height +0.1 to +0.3 in, springs +5 to +10%, bump +0.2.
- Wheel spin on exit: diff accel −4%, rear spring −5%, rear bump −0.2, rear downforce +15 lb.
- Lazy in chicanes: ARBs +1.0 each, rebound both +0.3, springs +5%.
Discipline-Specific Tunes
The chassis sliders above cover universal grip racing. Three other disciplines deliberately invert several of those settings. Pick a discipline per build, don't mix.
Race Tune Baseline
For an AWD circuit build in Forza Horizon 6, the current grip meta leans softer than older Horizons. Soft springs keep tires planted; stiff ARBs deliver mid-corner sharpness. The mechanical balance stat does the heavy lifting.
- Tires: 28 PSI front, 27–28 PSI rear (AWD start).
- Camber: −1.5 to −2° front, −1 to −1.5° rear.
- Caster: 7°.
- ARBs: stiff both, often near max F/R, then tune to mech balance 0.60.
- Springs: softer overall, balanced front/rear.
- Damping: rebound ~18 / bump ~6.
- Brakes: 52–55% front bias, pressure 100%.
- Diff: rear 55% accel / 15% decel; AWD center 70–80% rear.
- Aero: balance 0.40–0.45, overall near max for circuit tracks.
Drift Tune Baseline
Drift inverts the goal. You want the rear to slide, hold an angle, and recover cleanly. RWD only. Drift differential, drift springs / dampers, anti-roll bars front and rear, weight reduction as much as PI allows. Engine power is preference; many strong drift builds run mid power (700–900 hp) for control.
Pro Tip: some drift builders prefer the least grippy tire compound available rather than the dedicated drift compound. On older RWDs the stock compound or snow tires may actually deliver smoother slides than the drift tires. Test both before committing.
- Tire pressure: front normal, rear all the way down for least grip.
- Camber: front −5° (max), rear ~−1°.
- Toe: +1° front out, −0.1 to −0.2 rear in.
- Caster: max.
- ARBs: soft both (around 8 if you want some response, fully soft for Formula-style).
- Springs: soft, front and rear matched (~400 lb/in baseline).
- Damping: ~4 / 4 / 4 / 4 (soft).
- Brakes: 55–70% front bias if you want to brake mid-drift for tandems; 45–50% if you want rotation-first entries.
- Diff: drift diff installed → 100% rear accel, 10% decel as baseline.
- Gearing: tune last. Pick your main drift gear, dead-stop full throttle, adjust final drive until you hit redline without bouncing off the limiter.
Drag Tune Baseline
Drag is build-first, tune-second. AWD swaps launch fastest; RWD is lighter but demands skill. Max power, drag tires (widest rear, skinniest front), lightest wheels you can find, full weight reduction. Skip chassis bracing — it adds weight for handling benefits you won't use on a straight line.
- Tire pressure: max front, min rear.
- Camber: slight negative front, slight positive rear.
- Toe and caster: 0° toe; max caster.
- ARBs: soft front, stiff rear.
- Springs: stiff front, soft rear.
- Ride height: minimum both, rear slightly above front.
- Damping: stiff front bump + stiff rear rebound; soft front rebound + soft rear bump.
- Aero: minimum or removed.
- Diff accel: ~85%. Decel doesn't matter.
- Gearing: drag top gear all the way right, bring lower gears up to form a smooth curve. Tune 1st iteratively on the strip until launch is hard with controllable wheelspin.
Rally and Off-Road Notes
Rally and off-road sit between race and drift. Use rally or off-road suspension. Drop diff values by ~10% across the board vs the race baseline; bias the center diff more balanced (60–70% rear instead of 80%+). Tire pressures stay low (22–27 PSI on rally / off-road compounds). Add +1.0 rebound across the dampers vs the race baseline. Ride height stays slightly higher (5–7 in on most off-road builds) to keep the suspension off its travel limit on rough terrain.
Forza Horizon 6 Tuning FAQ
What is Mechanical Balance in FH6?
Mechanical Balance is a new tuning stat in Forza Horizon 6 that shows front-versus-rear mechanical grip as a single number. Target the 0.55–0.65 window using ARBs first, with the sweet spot around 0.60. Below 0.55 you'll understeer; above 0.65 you'll be unstable.
What is the best starting tire pressure?
For most race builds, start at 26–28 PSI on stock, street, and rally compounds, and around 32 PSI on semi-slicks and race slicks. AWD circuit builds commonly land at 28 front / 27 rear. Adjust 0.5 PSI at a time.
How do I fix understeer in Forza Horizon 6?
Diagnose the phase first. Entry understeer is usually fixed by softening the front ARB and reducing diff decel. Mid-corner understeer is mostly an ARB and downforce balance issue. Exit understeer is a diff accel and rear-spring problem. Don't stiffen the rear to fix front understeer — soften the front instead.
Should I tune all 9 systems on every car?
No. The order matters more than depth. On most low- and mid-class builds, you'll only meaningfully touch tires, ARBs, springs, alignment, brakes, diff, and final drive. Damping and aero only get serious attention on high-class or aero-heavy builds.
Do I need race suspension to tune?
Race suspension unlocks the full tuning sliders, so it's the default for any serious tune. The cost is 2–5 PI. Some cars with factory four-wheel steering (certain Skylines, Honda Prelude) actually drive better without race suspension because installing it removes the 4WS. Try without first if you're not sure.
What's the best brake bias for racing?
Around 52–55% forward for AWD and beginner setups; 48–51% forward for advanced RWD trail-braking. A single percent makes a noticeable difference, so move the slider in small steps.
How do I tune for drift?
Convert to RWD, install drift diff and drift springs / dampers, use the least grippy tire compound available, soften everything, max front camber (around −5°), drift diff at 100% rear accel, brake bias forward for tandems or rear for rotation entries. Tune gearing last, on a real road, by floor-revving in your main drift gear.
Why did my car feel worse after tuning?
You probably changed more than one parameter at once, or stiffened the strong end instead of softening the weak end. Reset, tune one slider at a time, and follow the tuning order. If five changes in things are still worse, undo everything and restart from the baseline.
How important is gear tuning?
Final drive is the highest-impact gearing slider and the only one most builds need. Get the car to hit the limiter in top gear at the end of the longest straight. Per-gear tuning only matters for drag, drift, and edge-case power/weight ratios.
Can I copy other players' tunes from Share Codes?
Yes, and it's a fine way to find a starting baseline on a class or car you don't want to build from scratch. The catch: a tune dialed in for one driver's controller or wheel may feel wrong for yours. Treat downloaded tunes as a starting point, then run the symptom matrix above for anything that bothers you.
Do tunes work the same on controller and wheel?
Not exactly. Wheel users get more precise steering and trail-braking input, so they tend to favor slightly looser setups (less front toe-out, less rear toe-in, slight rear-biased brake balance). Controller players usually want a slightly more stable baseline. Same fundamentals apply, the magnitudes shift.
How long does a full tune take?
A solid first-pass tune is 30–45 minutes if you know the workflow. Refining for one specific track adds another 15–20 minutes. The first time you tune from scratch it can take a couple of hours, mostly because you're learning the diagnosis loop. The second car is dramatically faster.
Final Thoughts
Tuning in Forza Horizon 6 rewards method over memorization. Follow the 9-step order, use Mechanical Balance as your modern compass, diagnose by corner phase before touching a slider, and change one thing at a time. Do that and you'll out-tune most of the lobby without copying anyone else's setup.
Build matters too. Front tire width, brake upgrades, and weight reduction give you grip your sliders alone can't unlock. If you skip the build pass, no amount of damping work will save the car. Build first, tune second, drive third.
If you want the car of your dreams without grinding for it, or you need the credits to fund engine swaps and tire upgrades, our Forza Horizon 6 boosting services get you straight to the fun part — actually tuning and racing the cars you care about, instead of farming for them.
