Diablo 4 Tempering & Masterworking Guide

-

- All masterworking materials available
- Fastest way to min-max your gear
- Increase your stats
-
Welcome to our ultimate Temper and Masterwork systems guide in Diablo 4! By reading all the sections of our article, you will learn about the new crafting system & how to use it at its full capacity while also understanding how the new upgrading system can transform your ordinary piece of gear into a beast.
Introduction
After a couple of iterations for an upgrade system, Blizzard has finally developed a very interesting endgame crafting feature, starting with Season 4. It has two main components: Tempering and Masterworking, each with its own particularities.
Upgrading your gear from basic to best-in-slot status will take a lot of grind and time, but it surely will be worth it if you know what to aim for. That is why we have compiled the ultimate guide to teach you what to focus on when Tempering your gear and when to stop Masterworking and instead try again by rerolling.
Table of Contents
Here is a little breakdown of our Diablo IV Tempering & Masterworking guide:
- Introduction
- Tempering Overview
- Tempering Particularities
- Masterworking Overview
- How do you Masterwork?
- Types of items you can Masterwork
- Masterwork Ranks & Particularities
- Tempering Manual List
- Final Thoughts
What is Tempering in Diablo 4?
Following the overhaul of the entire itemization that includes the removal of 1 affix from all the items you can obtain, the Tempering system comes up with a way to add two more affixes from two different categories onto the item, raising its power considerably.
Before you can add affixes by Tempering, you must earn Tempering Manuals. They are divided into six categories: Weapons, Offensive, Defensive, Utility, Mobility, and Resource. All items can have only two affixes, but not from the same category.
What is a Tempering Manual?
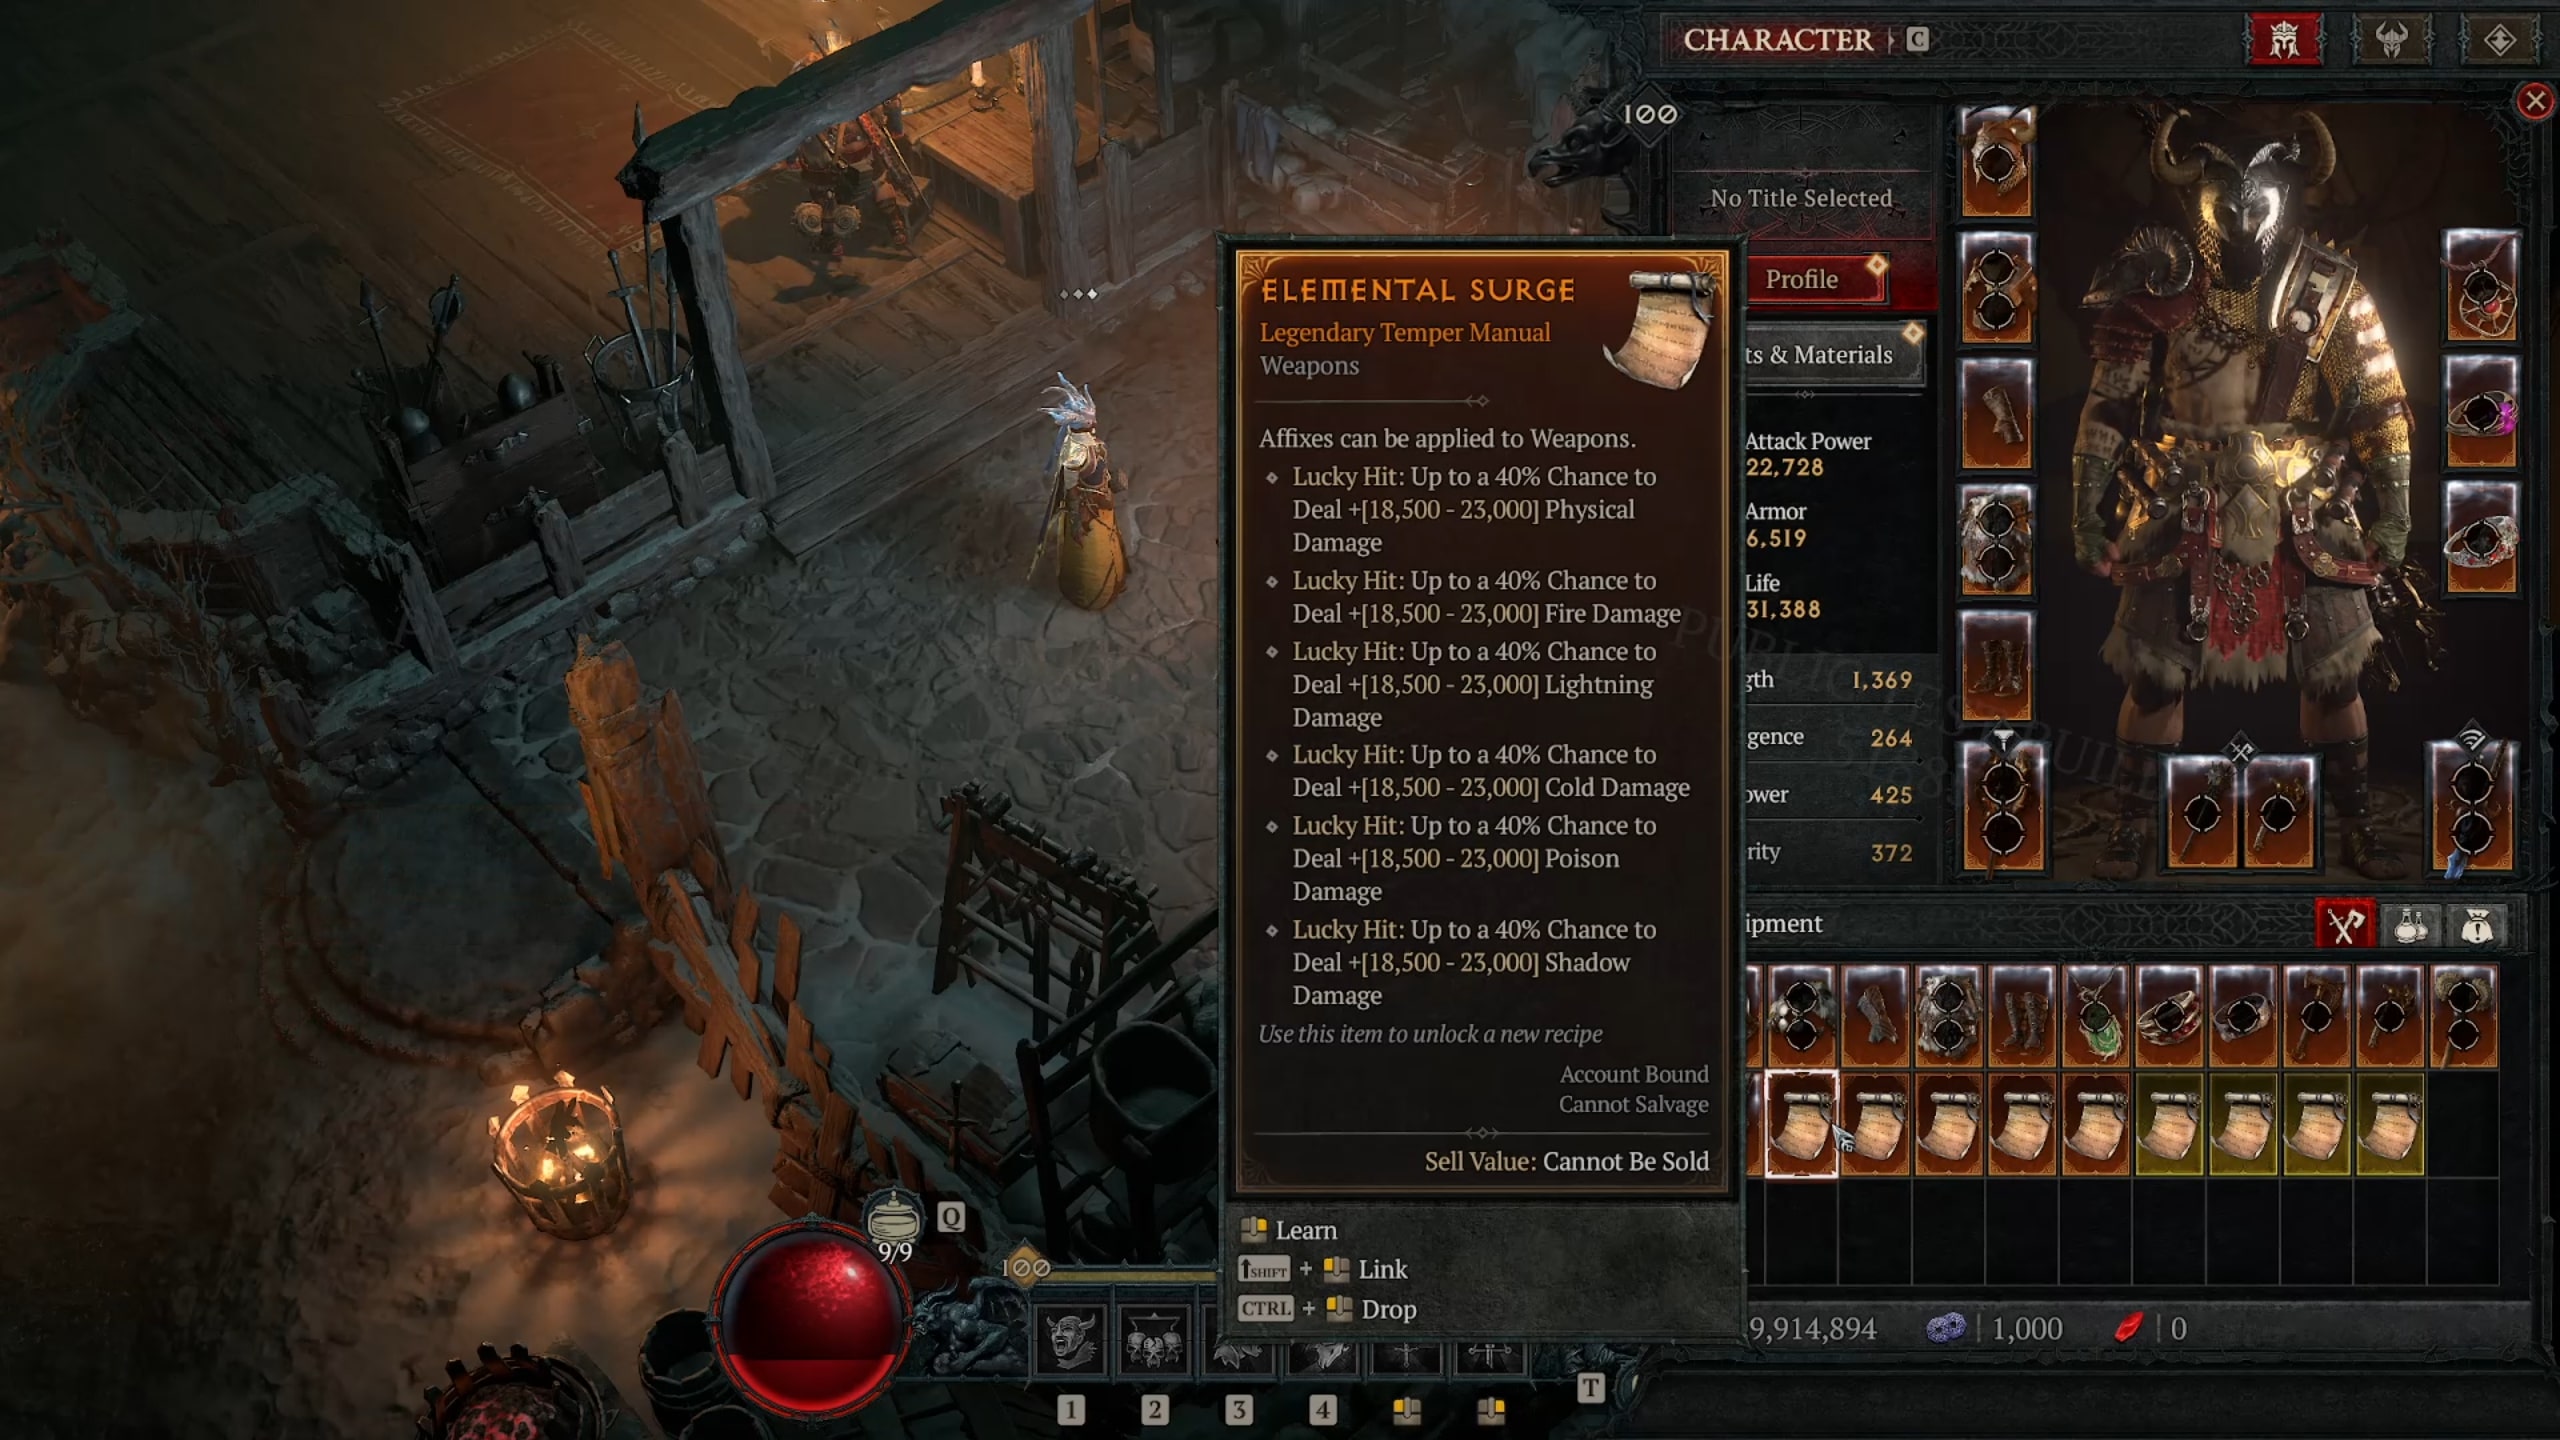
Like the new Codex of Power, which stores the legendary aspects you extract, Tempering Manuals unlock up to six new affixes. Just like the legendary aspects, these affixes can only be used on some particular item types.
Aside from the Tempering Manuals, additional materials will be needed to Temper items, like Gold, Veiled Crystals, Baleful Fragments, Coiling Wards, and Abtruse Sigils, depending on the item you want to empower.
How many times can a Tempering Manual be used in D4?
Once obtained and used, a Tempering Manual will disappear, leaving behind the unlocked and ready-to-use affixes. These affixes are permanently available for the player and have unlimited uses.
How to get Tempering Manuals in D4?
While there is no definite way to obtain the Tempering Manuals, they can drop pretty much anywhere:
- Helltides & Blood Maidens
- The Pit
- Uber & Tormented Bosses
- World Bosses
- Nightmare Dungeons
- Elite Enemies
The chances of obtaining Tempering Manuals will differ from place to place, but we are sure that the drop chance will rise with the content's difficulty.
Note: Our personal recommendation is to follow the normal progression until the late endgame because this will allow you to obtain plenty of Tempering Manuals.
What kind of items can you Temper?
With the exception of Unique and Uber Unique items, all items can be tempered; the only limitation will be the type of affix category, which we will detail in the following chapter.
Tempering Categories
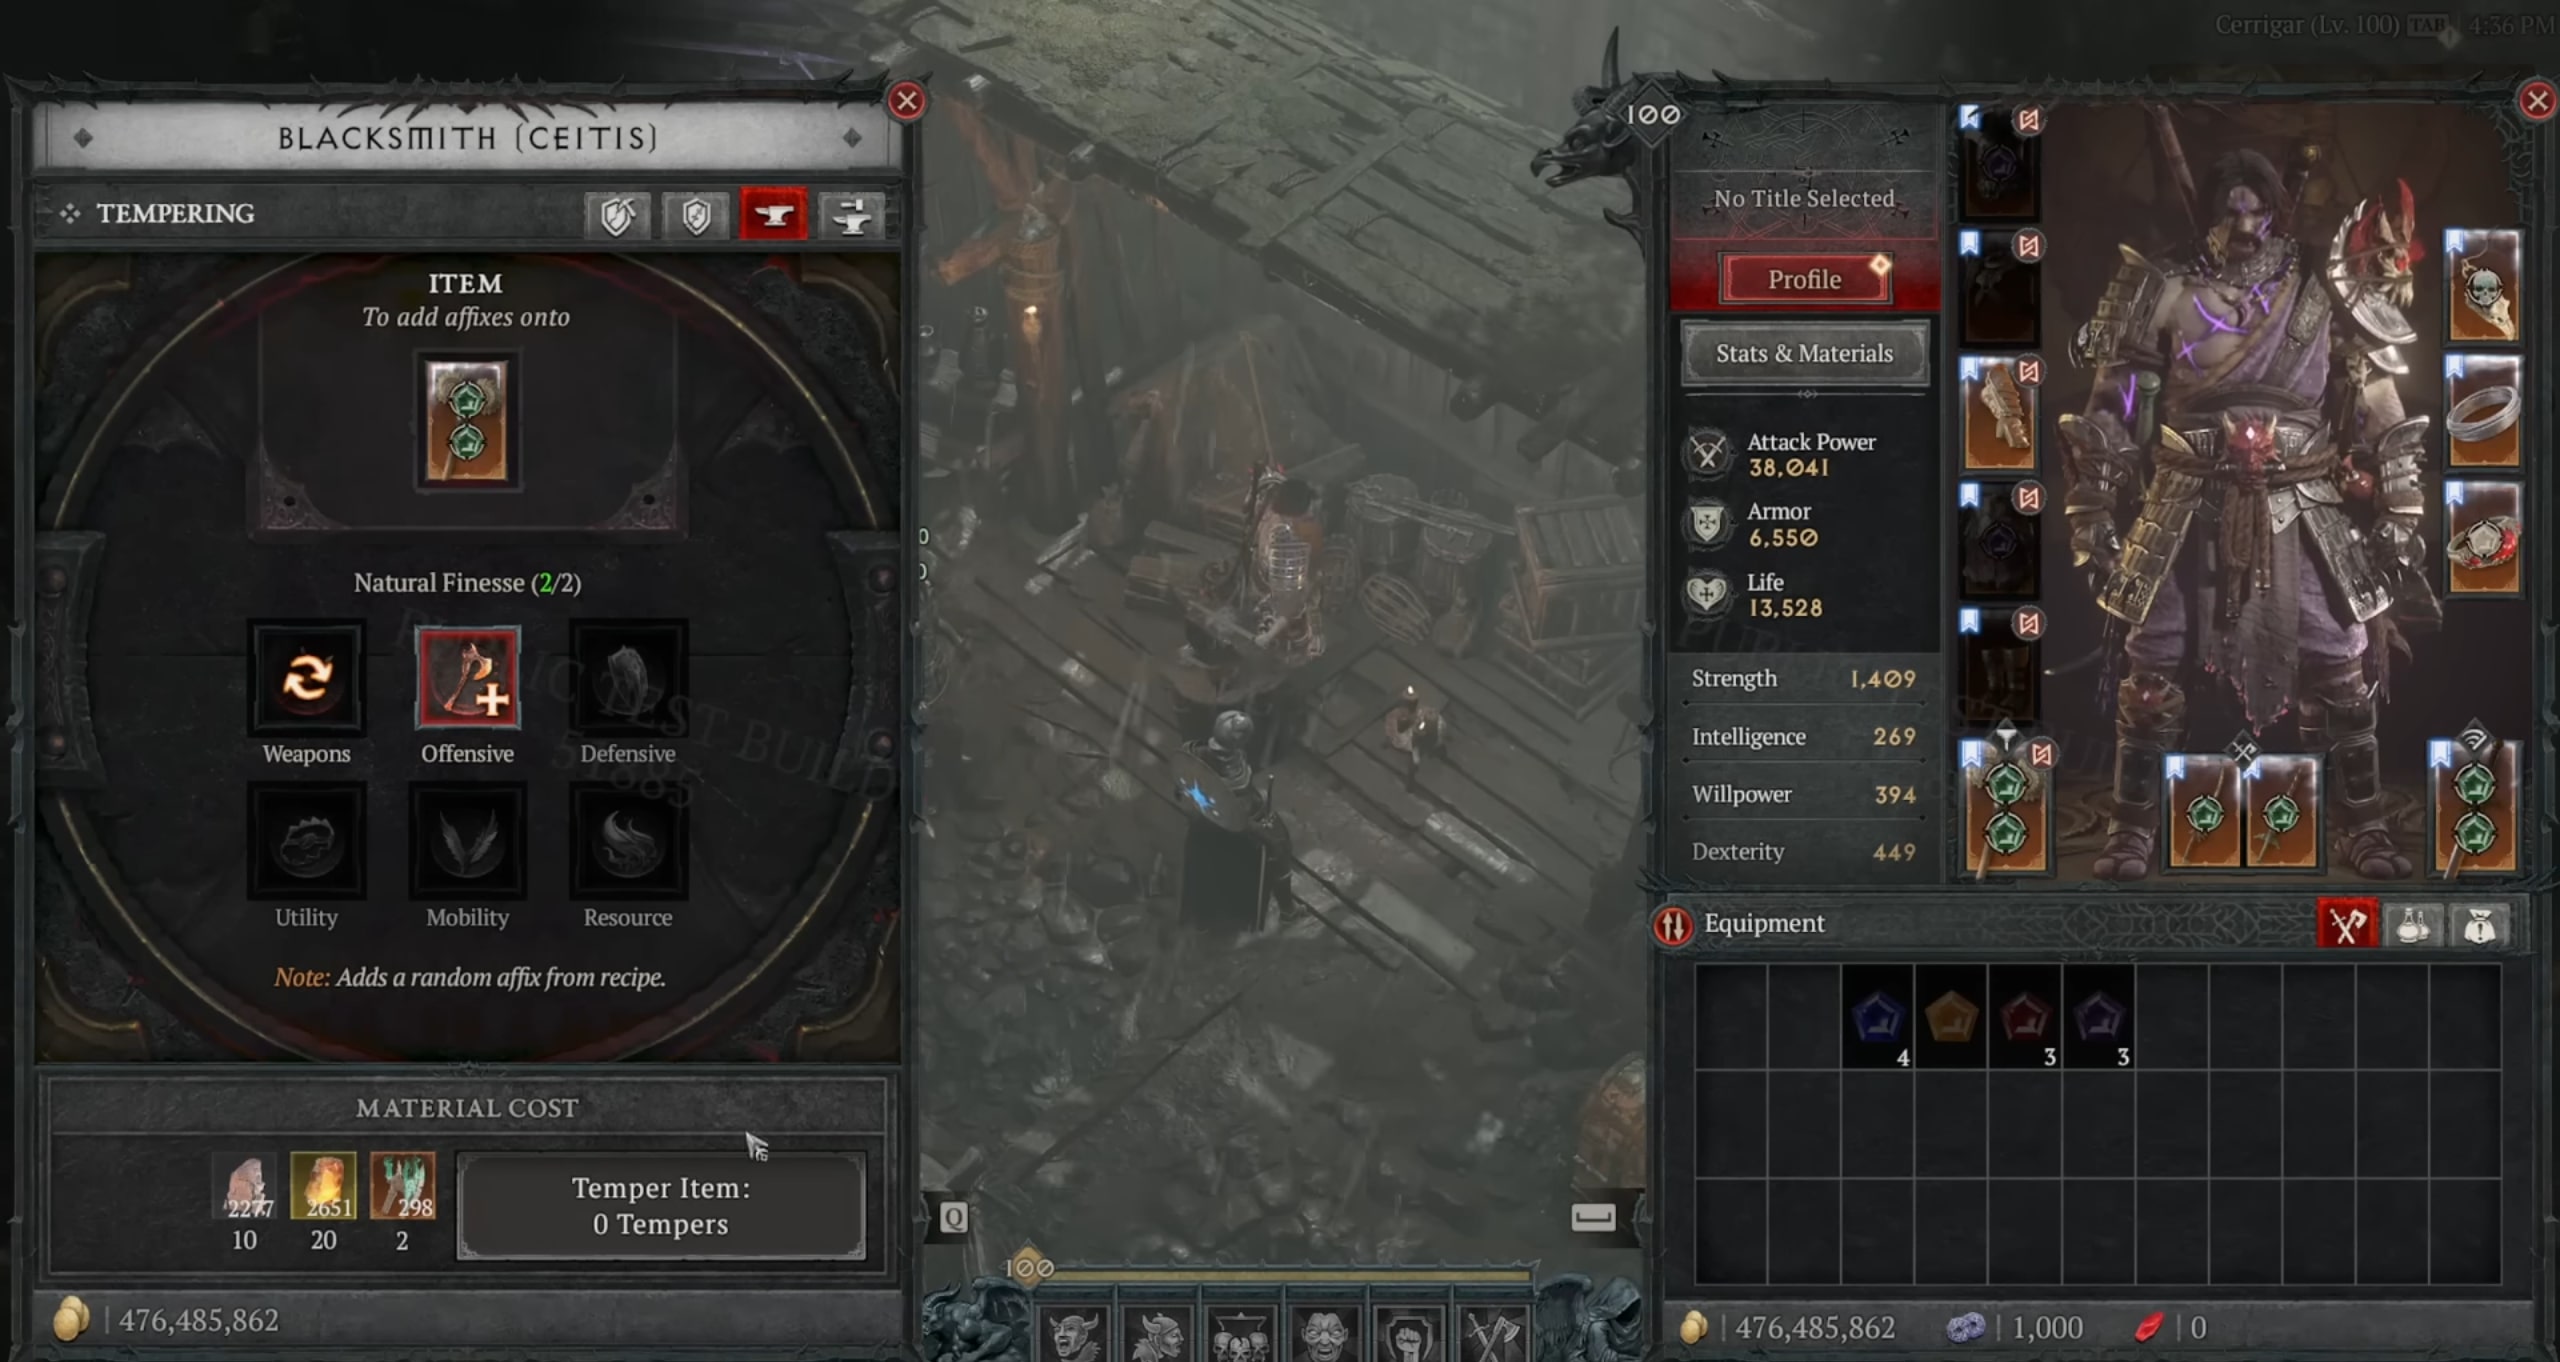
Just like the legendary aspects, Tempering affixes fall under the same categories, with the added "Weapons" category, as follows:
- Weapons: As you might have guessed, Weapons
- Offensive: Weapons, Amulets, Gloves, and Rings
- Defensive: Shields, Helms, Chest, Pants, and Amulets
- Utility: Shields, Helms, Chest, Pants, Amulets, Gloves, and Boots
- Mobility: Amulets and Boots
- Resource: Amulets and Rings
These categories will ensure that every type of item has at least two categories of Tempering available.
Can you temper Unique or Uber Unique items?
Unfortunately, Tempering Unique or Uber Unique items is not possible compared to Masterworking. On the bright side, the number of affixes on Unique and Uber Uniques has not been lowered, and their power remains unchanged.
This change will definitely impact the number of Unique and Uber Unique items used in most of the builds, as legendary items are way more versatile and powerful than them.
Can you trade tempered items?
Sadly, Tempered items cannot be traded. Just like when enchanting an item, Tempering it will lock the item, making it account-bound. The Tempering Manuals are also account-bound.
Tempering Rerolls

After adding the first two affixes by Tempering the item with the specific Tempering manual, if you are not happy with the affix or value roll, you will have the chance to reroll any of the two affixes for a total number of five times.
These five reroll chances are shared between both of the temper affixes, meaning you are very dependent on RNG if you are looking for a higher roll of value. After the five reroll chances, the item will become un-temperable, or as players call it, "bricked".
What is Masterworking in D4?
The Masterworking system replaces the old upgrading system overall, completely overhauling the way it works. Instead of simply being a 5-step upgrade, the Masterwork is divided into 12 ranks, each requiring a different amount and type of materials.
These Masterworking ranks will provide upgrades to the current affixes that can be found on the item in two main ways:
- All affixes will be upgraded by 5% - This applies to all ranks except 4, 8, and 12.
- One randomly chosen affix will be upgraded by 25% - This applies only to ranks 4, 8, and 12.
Masterworking is not limited to the regular affixes that come with the item; it can also improve the Tempered affixes.
Note: The randomly chosen affix can be the same for all three major Masterwork upgrades (4, 8, 12), raising the potential of the affix to insane powers.
How do you unlock Masterworking?
Since the upgrade system has been removed, the Tempering system and Masterworking are replacing it. Compared to Tempering, Masterworking will be unlocked later in the game.
Clearing The Pit is required for Masterworking, so the only limitation to this system is when a player can start clearing The Pit tiers.
Note: The first tier of The Pit contains monsters that are equivalent to Nightmare Dungeon tier 46, level 100. Using a powerful S-tier build will surely help you clean pit tiers way before hitting level 100 yourself.
How do you Masterwork items?
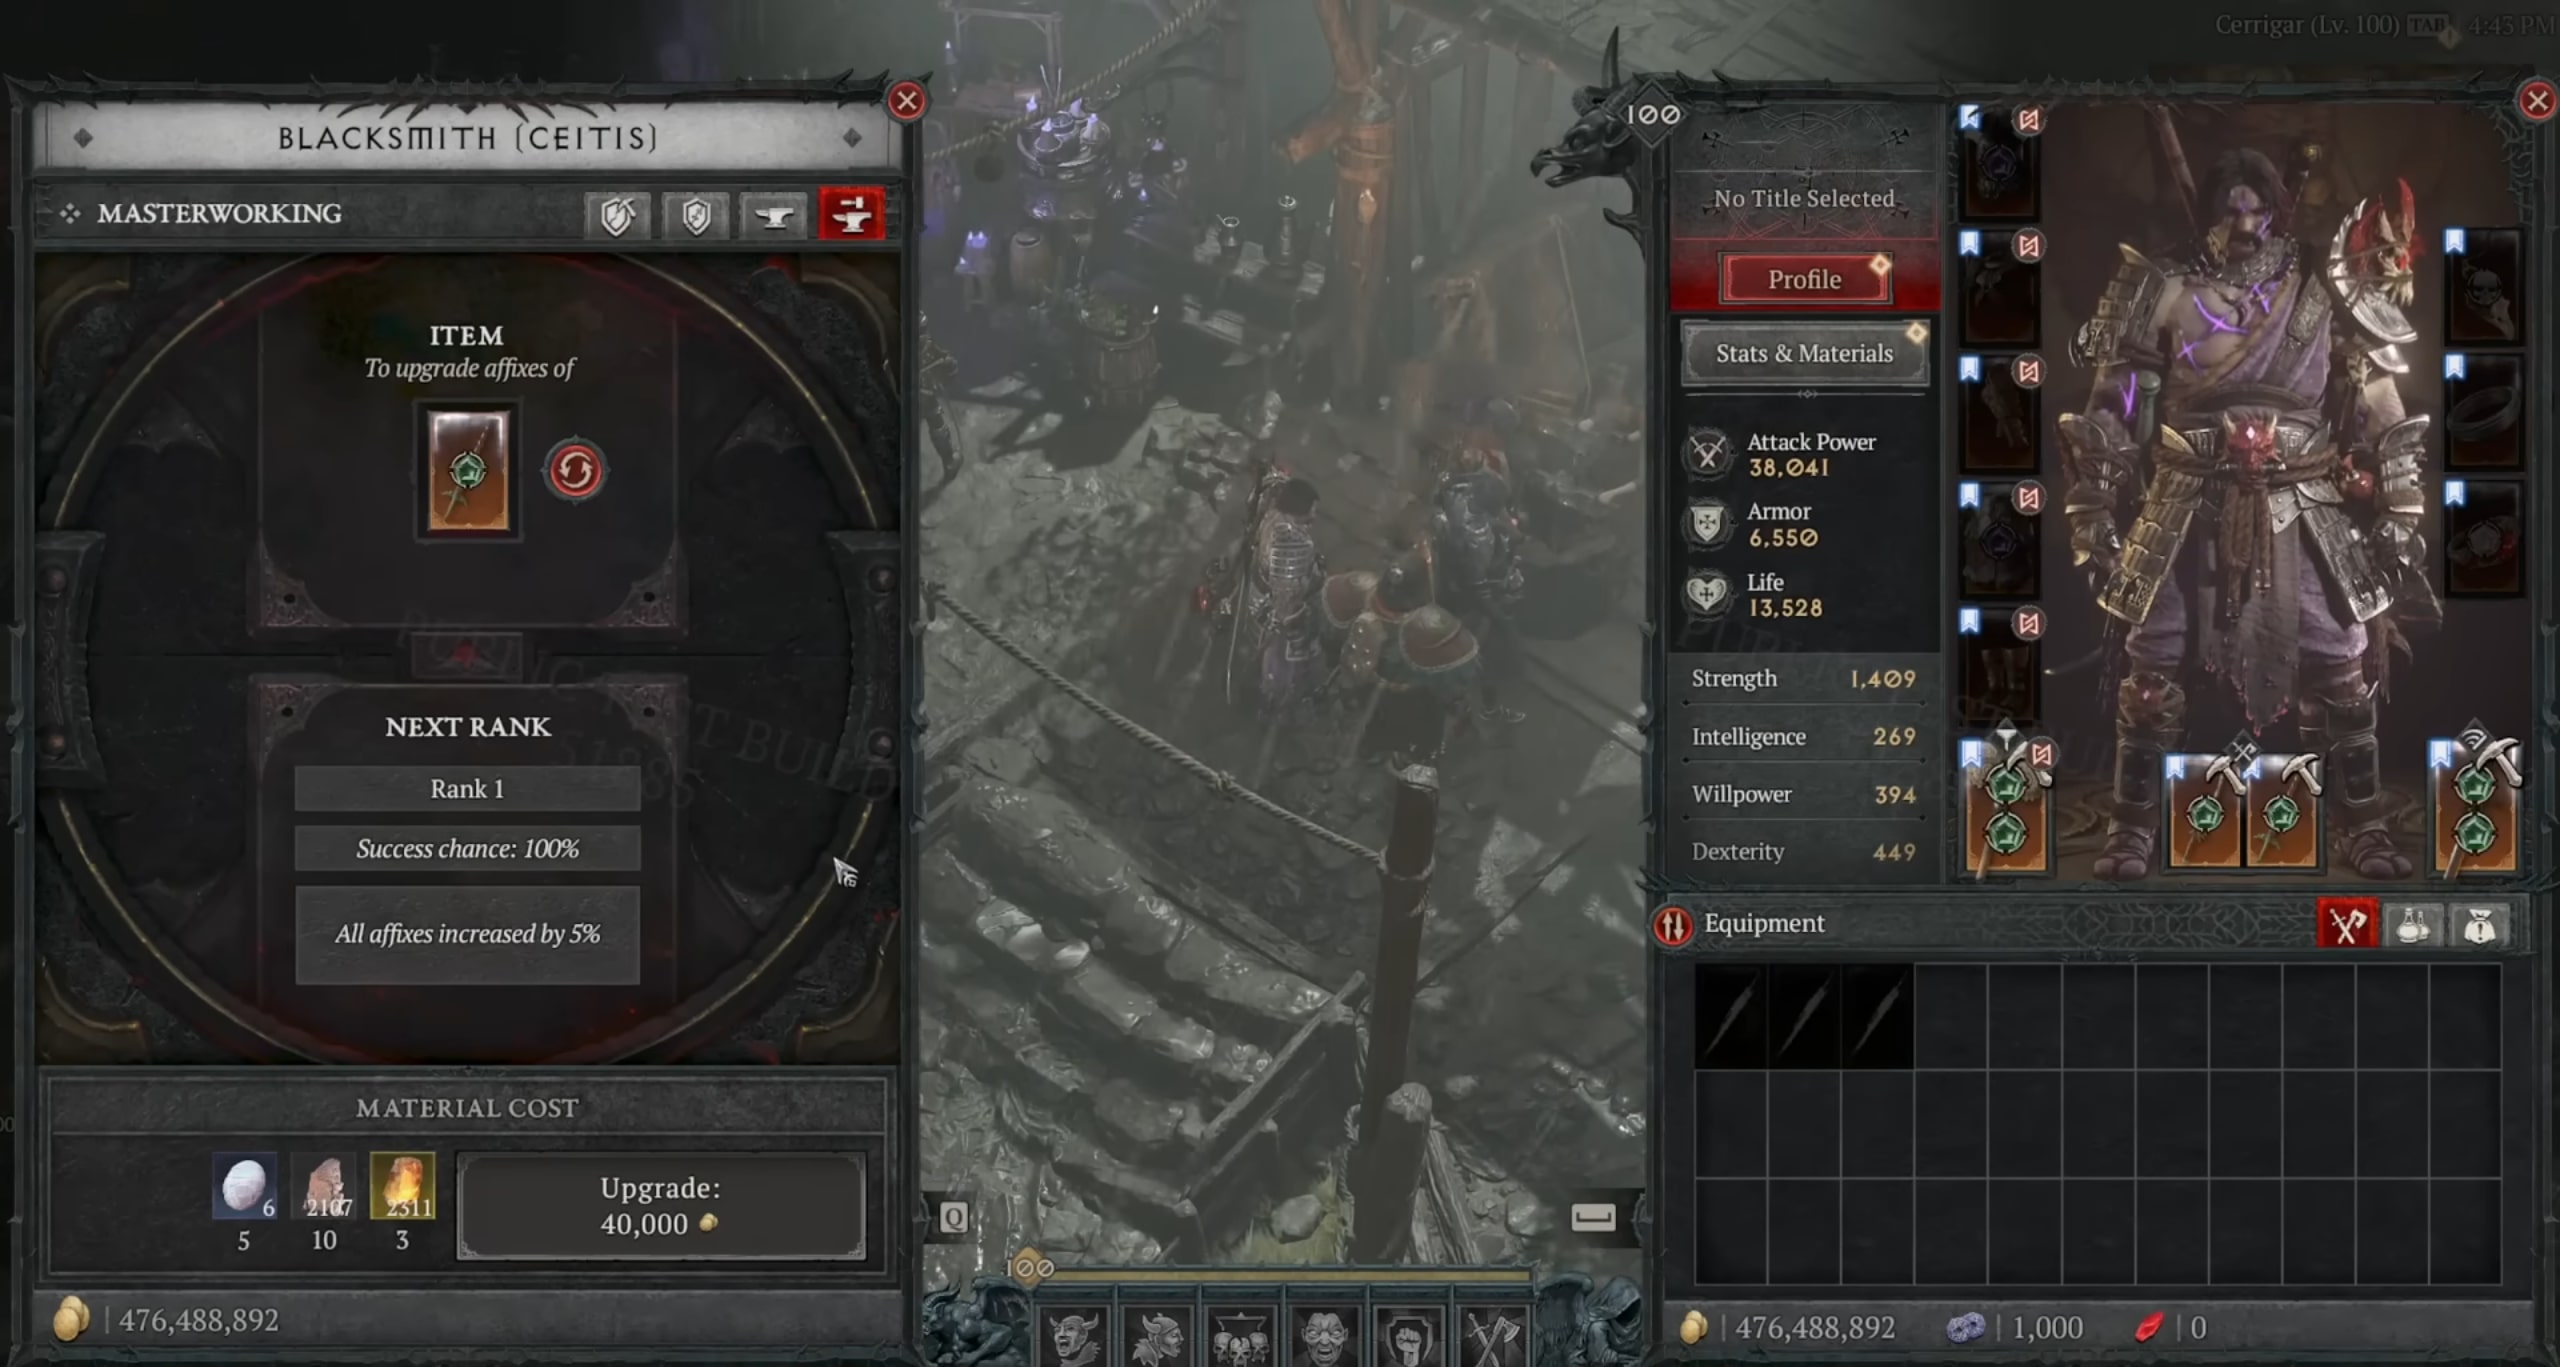
To Masterwork items, you simply go to the Blacksmith and select the "Masterworking" tab. After selecting the item you want to empower, you will have to provide the necessary materials and gold.
After Masterworking your item once, you can continue doing it for all 12 ranks, using exponentially more materials but also gaining more power. Every rank will provide a 5% increase to all affixes, except ranks 4, 8, and 12, which will be more powerful.
The ranks 4, 8, and 12 will randomly choose one affix and raise its powers by 25%. With a lot of luck, all these empowerments can go on a single affix, creating a best-in-slot or very impactful item. The very powerful upgrade can be on any of the five available affixes up to 3 times.
Masterworking Materials
The most important materials used for Masterworking items can be found in The Pit on different tiers, while the others can be found mainly in the open world or through salvaging, as follows:
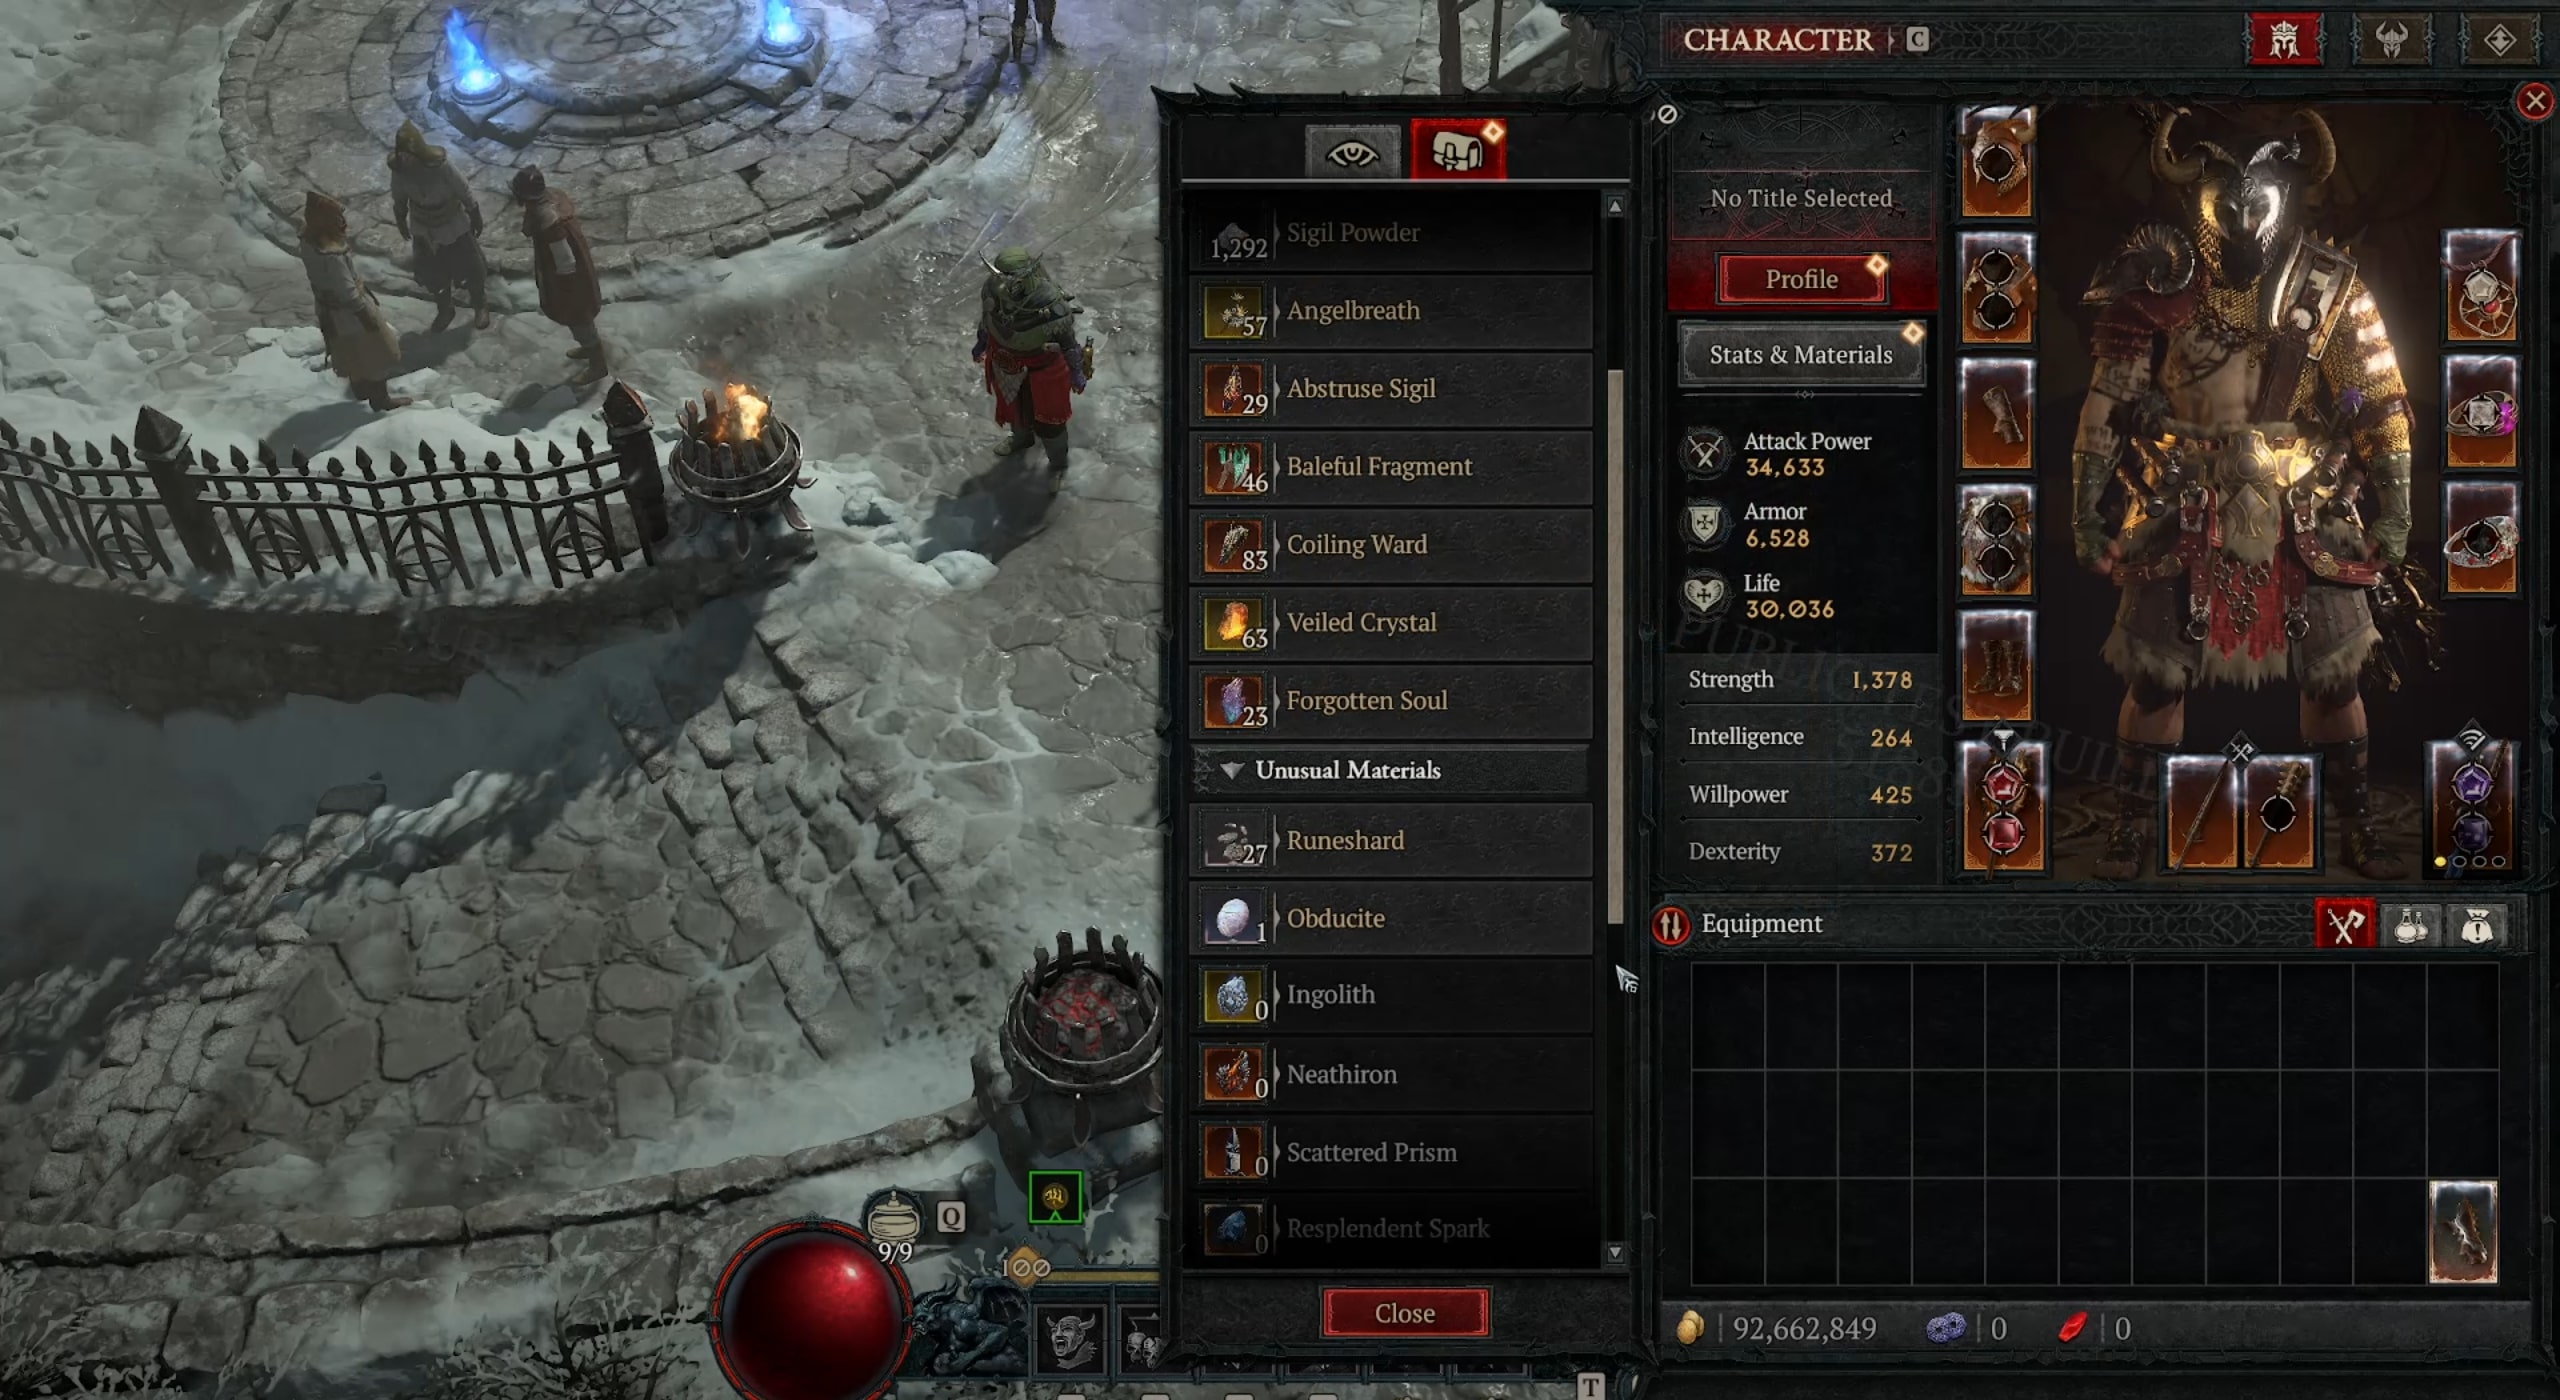
- Obducite, Ingolith, and Neathiron - Can only be obtained by completing The Pit or the Infernal hordes on different tiers.
- Veiled Crystal - One of the most common materials found in the game, can be obtained through the open world or by simply salvaging items.
- Baleful Fragment/Coiling Ward/Abtruse Sigil - A bit rarer than the previous material, these can also be found in the open world or by salvaging their respective legendary item types - Weapons, Armor, and Jewelry.
- Forgotten Soul - The rarest material besides the special ones, it can be obtained by slaying elite monsters or by clearing Helltide events.
How to get Masterworking Materials
The Masterworking system materials can only be obtained by completing The Pit or The Infernal Hordes. They are split through the tiers as follows:
- Obducite - Can be obtained by completing The Pit on the lowest of the tiers, up to tier 30. In the Infernal Hordes, Tiers 3 & 4 will provide Obducite when opening the Spoils of Materials.
- Ingolith - This material only drops once The Pit is completed on tiers 31-60. Spoils of Materials from Tier 5 & 6 will provide this material.
- Neathiron - The highest tier of this type of material can be obtained by completing The Pit, starting from tiers 61 to 200. Also, the Material Spoils will provide Neathiron in Tier 7 & 8 of the Infernal Hordes.
The only exception is The Alchemist, where a player can transmute higher-tier materials into more lower-tier materials, solving the issue that lower-tier materials won't drop on higher Pit tiers.

Types of Masterworking Materials
All the materials needed in the Masterworking system can be divided into two main categories:
- Special Materials - Obducite, Ingolith, and Neathiron. As previously mentioned, these materials can only be obtained by completing The Pit runs on different tiers or from Tier 3 to 8 of the Infernal Hordes activity and opening the Spoils of Materials at the cost of 20 Burning Aether.
- Normal Materials - These materials can be obtained from most of the activities in the game, starting from open-world monsters to nightmare dungeons and salvaging items, as well as from The Pit.
Considering the frequency at which players will swap gear pieces, Masterworking items won't be necessary until higher levels, at least not going higher than Masterwork rank 4. We consider Masterworking to be best used to optimize gear for endgame activities.
Masterwork materials cap limit
Compared to other systems in the game, the Masterwork materials don't really have a cap, at least not an easily reachable one. The cap we are talking about is speculated to be 999,999, but we don't think anyone will reach that in any upcoming season.
Can you trade Masterwork materials?
Sadly, no, you cannot trade Masterworking materials. Alongside other materials and special goods like Resplendent Sparks, the Masterworking materials are stored in the "Materials" tab, which makes them account-bound.
What type of items can you Masterwork?
Since the Temper and Masterwork systems have completely replaced the old upgrade system, every type of item in the game can be Masterworked and empowered.
For every item type, except the Uniques, at least two categories of Tempering manuals are available. These tempered affixes can further be upgraded by the normal and rank 4, 8, and 12 Masterworks, raising their potential immensely.
Can you Masterwork Unique or Uber Unique items?
As we have previously said, Unique and Uber Unique items can definitely be Masterworked. The only problem is that only the regular affixes (not the Unique affixes) can be upgraded, as far as we are aware. This might be subject to change in the future.
The Difference between regular and Masterworked Stats
There is mainly just one difference between a regular and a Masterworked affix - The value or percentage. Masterworking an item to the maximum will raise the affixes' value or percentage by a minimum of 45%, not considering the possibility of hitting the 25% raise of ranks 4, 8, and 12.
When Masterworking an item to the maximum rank, make sure you are upgrading an item that is worth it. If the 4, 8, and 12 Masterwork ranks do not upgrade your desired affix, you can consider rerolling the Masterwork.
Greater affixes and Masterworking
Just like normal affixes, the greater ones can be affected by the Masterworking system, empowering them even further. The only difference here is the greater affixes will have a better range of values or percentages, making the Masterworked version the best possible outcome for the affix.
Masterworking Ranks & Chance
As previously mentioned, there are 12 Masterworking ranks in the new crafting system in Diablo 4, ready to empower your items off their limit. Unexpectedly, as you progress through the ranks, the success chance will not lower, staying at 100%.
| Masterwork Rank | Materials |
| Rank 1 | • Obducite x10 • Rawhide / Iron Chunk x10 • Veiled Crystals x3 • 100,000 Gold |
| Rank 2 | • Obducite x20 • Rawhide / Iron Chunk x10 • Veiled Crystals x3 • 150,000 Gold |
| Rank 3 | • Obducite x30 • Rawhide / Iron Chunk x15 • Veiled Crystals x4 • 200,000 Gold |
| Rank 4 | • Obducite x40 • Rawhide / Iron Chunk x15 • Veiled Crystals x4 • 300,000 Gold |
| Rank 5 | • Ingolith x20 • Rawhide/Iron Chunk x25 • Veiled Crystals x6 • 400,000 Gold |
| Rank 6 | • Ingolith x40 • Rawhide/Iron Chunk x30 • Veiled Crystals x8 • 450,000 Gold |
| Rank 7 | • Ingolith x80 • Rawhide/Iron Chunk x40 • Veiled Crystals x10 • 500,000 Gold |
| Rank 8 | • Ingolith x120 • Rawhide/Iron Chunk x50 • Veiled Crystals x15 • 600,000 Gold |
| Rank 9 | • Neathiron x50 • Veiled Crystals x20 • Abtruse Sigil / Baleful Fragment / Coiling Ward x10 • Forgotten Soul x3 • 800,000 Gold |
| Rank 10 | • Neathiron x100 • Veiled Crystals x30 • Abtruse Sigil / Baleful Fragment / Coiling Ward x10 • Forgotten Soul x5 • 1,000,000 Gold |
| Rank 11 | • Neathiron x150 • Veiled Crystals x40 • Abtruse Sigil / Baleful Fragment / Coiling Ward x15 • Forgotten Soul x7 • 1,500,000 Gold |
| Rank 12 | • Neathiron x250 • Veiled Crystals x50 • Abtruse Sigil / Baleful Fragment / Coiling Ward x20 • Forgotten Soul x10 • 2,500,000 Gold |
Can you reroll Masterworked ranks?
Yes, you can reroll Masterworking ranks. In contrast to temper rerolling, Masterwork rerolls do not cost anything and can be performed as often as the player wants. This will ensure that the player can craft their perfect items, min-maxing affixes, creating the ideal build.
CHEAP DIABLO 4 BOOSTING SERVICES
Can you trade Masterworked items?
Sadly, no, you cannot trade Masterworked items in Diablo 4. Just like enchanted items or the materials needed for these processes, the items will become account-bound once the Tempering or Masterworking begins. However, the legendary items, even the ones with greater affixes, are tradeable, which makes up for this.
Tempering Manual List
Below we present a complete list of the Tempering Manuals, including their rarity and full information.
All Class Tempering Manuals:
| Tempering Manual | Item Type | Affix |
| Elemental Surge Elemental Surge Elemental Surge |
Weapons | •Lucky Hit: Up to a 40% Chance to Deal +X Elemental Damage (Physical, Fire, Lightning) |
| Elemental Surge Elemental Surge Elemental Surge |
Weapons | •Lucky Hit: Up to a 40% Chance to Deal +X Elemental Damage (Cold, Poison, Shadow) |
| Natural Finesse Natural Finesse Natural Finesse |
Weapons Gloves Rings Amulets |
+X% Damage +X% Damage to Crowd Controlled Enemies +X% Damage to Close Enemies +X% Damage to Distant Enemies |
| Natural Motion Natural Motion Natural Motion |
Boots Amulets |
+X% Movement Speed +X% Movement Speed for 4 Seconds After Killing an Elite •X% Mobility Cooldown Reduction •X% Evade Cooldown Reduction |
| Natural Resistance Natural Resistance Natural Resistance |
Helms Chest Armor Pants Shields Amulets |
+X% Fire Resistance +X% Lightning Resistance +X% Cold Resistance +X% Poison Resistance +X% Shadow Resistance |
| Natural Schemes Natural Schemes Natural Schemes |
Helms Chest Armor Gloves Pants Boots Shields Amulets |
+X Thorns +X% Crowd Control Duration +X% Barrier Generation |
| Sharpened Finesse Sharpened Finesse Sharpened Finesse |
Weapons Gloves Rings Amulets |
+X% Basic Damage +X% Core Damage •X% Ultimate Damage |
| Worldly Endurance Worldly Endurance Worldly Endurance |
Helms Chest Armor Pants Shields Amulets |
+X Maximum Life +X% Total Armor •X% Dodge Chance |
| Worldly Finesse Worldly Finesse Worldly Finesse |
Weapons Gloves Rings Amulets |
+X% Critical Strike Damage +X% Vulnerable Damage •X% Overpower Damage |
| Worldly Fortune Worldly Fortune Worldly Fortune |
Helms Chest Armor Gloves Pants Boots Shields Amulets |
•Lucky Hit: Up to a +X% Chance to Slow/Immobilize/Stun/Freeze for 2 Seconds |
| Worldly Stability Worldly Stability Worldly Stability |
Ring Amulet |
•X% Resource Generation •X% Resource Cost Reduction •Lucky Hit: Up to a 5% Chance to Restore +X% Primary Resource |
Spiritborn Tempering Manuals:
| Tempering Manual | Item Type | Affix |
| Centipede Augments Centipede Augments Centipede Augments |
Weapons | +X% Chance for Withering Fist to Deal Double Damage +X% Chance for Stinger to Extra Hit +X% Chance for The Devourer to Deal Double Damage +X% Primary Centipede Spirit Hall Potency |
| Centipede Efficiency Centipede Efficiency Centipede Efficiency |
Rings Amulets |
X% Withering Fist Resource Generation X% The Devourer Cooldown Reduction X% Potency Cooldown Reduction |
| Centipede Finesse Centipede Finesse Centipede Finesse |
Weapons Gloves Rings Amulets |
+X% Potency Damage +X% Pestilent Swarm Damage +X% Centipede Damage +X% Damage to Slowed Enemies |
| Centipede Innovation Centipede Innovation Centipede Innovation |
Weapons Gloves Rings Amulets |
+X% Withering Fist Size +X% Stinger Size +X% Scourge Size +X% Touch of Death Swarm Duration |
| Eagle Augments Eagle Augments Eagle Augments |
Weapons | +X% Chance for Thunderspike to Deal Double Damage +X% Chance for Quill Volley Projectiles to Cast Twice +X% Chance for The Seeker to Deal Double Damage +X% Primary Eagle Spirit Hall Potency |
| Eagle Efficiency Eagle Efficiency Eagle Efficiency |
Rings Amulets |
X% Thunderspike Resource Generation +X The Seeker Charges X% Focus Cooldown Reduction +X Razor Wings Charges |
| Eagle Finesse Eagle Finesse Eagle Finesse |
Weapons Gloves Rings Amulets |
+X% Focus Damage +X% Storm Feather Potency +X% Eagle Damage +X% Vulnerable Damage |
| Eagle Innovation Eagle Innovation Eagle Innovation |
Helms Chest Armor Gloves Pants Boots Shields Amulets |
+X% Thunderspike Size +X% Vortex Size +X% Soar Size |
| Fitness Efficiency Fitness Efficiency Fitness Efficiency |
Rings Amulets |
+X to Vigorous +X to Velocity +X to Endurance |
| Forest Augments Forest Augments Forest Augments |
Weapons | +X% Chance for Payback to Deal Double Damage +X% Chance for Concussive Stomp to Extra Hit +X to Dominant |
| Gorilla Augments Gorilla Augments Gorilla Augments |
Weapons | +X% Chance for Rock Splitter to Deal Double Damage +X% Chance for Crushing Hand to Extra Hit +X% Chance for The Protector to Deal Double Damage +X% Primary Gorilla Spirit Hall Potency |
| Gorilla Efficiency Gorilla Efficiency Gorilla Efficiency |
Rings Amulets |
X% Rock Splitter Resource Generation X% The Protector Cooldown Reduction X% Defensive Cooldown Reduction |
| Gorilla Finesse Gorilla Finesse Gorilla Finesse |
Weapons Gloves Rings Amulets |
+X to Bastion +X% Defensive Damage +X% Gorilla Damage +X% Damage to Knocked-Down Enemies |
| Gorilla Innovation Gorilla Innovation Gorilla Innovation |
Helms Chest Armor Gloves Pants Boots Shields Amulets |
+X% Rock Splitter Size +X% Crushing Hand Size +X% Concussive Stomp Size +X% Armored Hide Active Thorns Bonus |
| Jaguar Augments Jaguar Augments Jaguar Augments |
Weapons | +X% Chance for Thrash to Deal Double Damage +X% Chance for Rake to Extra Hit +X% Chance for The Hunter to Deal Double Damage +X% Primary Jaguar Spirit Hall Potency |
| Jaguar Efficiency Jaguar Efficiency Jaguar Efficiency |
Rings Amulets |
X% Thrash Resource Generation X% The Hunter Cooldown Reduction X% Incarnate Cooldown Reduction +X Counterattack Charges |
| Jaguar Finesse Jaguar Finesse Jaguar Finesse |
Weapons Gloves Rings Amulets |
+X% Mobility Damage +X% Mystic Circle Potency +X% Jaguar Damage +X% Damage to Injured Enemies |
| Jaguar Innovation Jaguar Innovation Jaguar Innovation |
Helms Chest Armor Gloves Pants Boots Shields Amulets |
+X% Thrash Size +X% Rake Size +X% Ravager On Kill Duration Extension |
| Plains Augments Plains Augments Plains Augments |
Weapons | +X% Chance for Rushing Claw to Deal Double Damage +X% Chance for Ravager to Deal Double Damage +X to Furnace |
| Sky Augments Sky Augments Sky Augments |
Weapons | +X% Chance for Soar to Deal Double Damage +X to Brilliance +X% Chance for Vortex to Extra Hit +X% Chance for Razor Wings Projectiles to Cast Twice |
| Soil Augments Soil Augments Soil Augments |
Weapons | +X% Chance for Touch of Death Swarms To Reinfect On Hit +X% Scourge Poisoning Duration +X to Ravenous |
| Spiritborn Endurance Spiritborn Endurance Spiritborn Endurance |
Helms Chest Armor Gloves Pants Boots Shields Amulets |
+X% The Protector Barrier Generation +X% Crushing Hand Barrier Generation +X% Concussive Stomp Barrier Generation +X to Auspicious |
| Spiritborn Guard Spiritborn Guard Spiritborn Guard |
Helms Chest Armor Gloves Pants Boots Shields Amulets |
+X% Rock Splitter Block Chance Bonus +X% Armored Hide Active Duration +X to Patient Guard |
| Spiritborn Motion Spiritborn Motion Spiritborn Motion |
Boots Amulets |
X% Soar Cooldown Reduction +X Rushing Claw Charges +X to Swift |
| Spiritborn Recovery Spiritborn Recovery Spiritborn Recovery |
Helms Chest Armor Gloves Pants Boots Shields Amulets |
+X% Touch of Death Healing Bonus +X to Fueled +X to Resilient |
| Spiritborn Resolve Spiritborn Resolve Spiritborn Resolve |
Helms Chest Armor Gloves Pants Boots Shields Amulets |
+X% Armored Hide Resolve Generation Rate +X Resolve Generated +X Maximum Resolve Stacks |
Barbarian Tempering Manuals:
| Tempering Manual | Item Type | Affix |
| Arsenal Finesse Arsenal Finesse Arsenal Finesse |
Weapons Gloves Rings Amulets |
+X% Damage with Two-Handed Bludgeoning Weapons +X% Damage with Dual-Wielded Weapons +X% Damage with Two-Handed Slashing Weapons +X% Damage when Swapping Weapons |
| Barbarian Breach Barbarian Breach Barbarian Breach |
Helms Chest Armor Gloves Pants Boots Shields Amulets |
+X% Kick Vulnerable Duration +X to Expose Vulnerability +X to Pressure Point |
| Barbarian Control Barbarian Control Barbarian Control |
Helms Chest Armor Gloves Pants Boots Shields Amulets |
Steel Grasp Stuns for +X Seconds Upheaval Overpowers Stun for +X Seconds +X to Concussion |
| Barbarian Innovation Barbarian Innovation Barbarian Innovation |
Helms Chest Armor Gloves Pants Boots Shields Amulets |
+X Earthquake Size +X Frenzy Duration +X% Stun Duration |
| Barbarian Motion Barbarian Motion Barbarian Motion |
Boots Amulet |
+X% Movement Speed +X% Movement Speed for 4 Seconds After Killing an Elite +X% Lunging Strike Range •X% Charge Cooldown Reduction •X% Leap Cooldown Reduction |
| Barbarian Recovery Barbarian Recovery |
Helms Chest Armor Pants Shields Amulets |
+X% Lunging Strike Healing +X to Raid Leader +X to Invigorating Fury |
| Barbarian Strategy Barbarian Strategy |
Helms Chest Armor Pants Shields Amulets |
•X% Ground Stomp Cooldown Reduction •X% Iron Skin Cooldown Reduction •X% Challenging Shout Cooldown Reduction |
| Berserking Augments Berserking Augments Berserking Augments |
Weapons | +X% Double Swing Size +X% Whirlwind Size +X% Berserking Duration |
| Berserking Finesse Berserking Finesse Berserking Finesse |
Weapons Gloves Rings Amulets |
+X% Damage while Berserking +X% Damage while Wrath of the Berserker is Active +X% Damage while War Cry is Active +X% Dust Devil Damage |
| Bleed Augments Bleed Augments Bleed Augments |
Weapons | +X to Cut to the Bone +X% Chance for Rend to Hit Twice +X% Chance for Rupture to Deal Double Damage |
| Bleed Innovation Bleed Innovation Bleed Innovation |
Weapons | +X% Rend Size +X% Enhanced Rupture Explosion Size +X to Hamstring |
| Brawling Augments Brawling Augments Brawling Augments |
Weapons | •X% Chance for Charge to Deal Double Damage •X% Chance for Kick to Deal Double Damage •X% Chance for Leap to Deal Double Damage •X% Chance for Ground Stomp to Hit Twice |
| Brawling Efficiency Brawling Efficiency Brawling Efficiency |
Rings Amulets |
•X% Brawling Cooldown Reduction •X% Kick Cooldown Reduction •X% War Cry Cooldown Reduction |
| Brute Innovation Brute Innovation Brute Innovation |
Helms Chest Armor Gloves Pants Boots Shields Amulets |
•X% Hammer of the Ancients Size •X% Upheaval Size •X% Mighty Throw Pulse Size |
| Core Augments - Barbarian Core Augments - Barbarian Core Augments - Barbarian |
Weapons | •X% Chance for Hammer of the Ancients to Deal Double Damage •X% Chance for Whirlwind to Deal Double Damage •X% Chance for Upheaval to Deal Double Damage •X% Chance for Double Swing to Hit Twice |
| Demolition Finesse Demolition Finesse Demolition Finesse |
Weapons Gloves Rings Amulets |
+X% Brawling Damage +X% Weapon Mastery Damage +X% Damage while Iron Maelstrom is Active |
| Furious Augments Furious Augments Furious Augments |
Weapons | •Bash Cleaves for +X% Damage +X% Chance for Frenzy to Hit Twice +X% Chance for Lunging Strike to Deal Double Damage +X% Flay Duration |
| Slayer's Finesse Slayer's Finesse Slayer's Finesse |
Weapons | +X% Vulnerable Damage +X% Damage to Injured Enemies +X% Physical Damage Over Time |
| Thorn Body Thorn Body |
Helms Chest Armor Gloves Pants Boots Shields Amulets |
+X% Thorns while Fortified +X to Outburst +X to Tough as Nails |
| Ultimate Efficiency — Barbarian Ultimate Efficiency — Barbarian Ultimate Efficiency — Barbarian |
Rings Amulets |
•Casting Ultimate Skills Restores +X Primary Resource •X% Call of the Ancients Cooldown Reduction •X% Iron Maelstrom Cooldown Reduction •X% Wrath of the Berserker Cooldown Reduction |
| Wasteland Augments Wasteland Augments Wasteland Augments |
Weapons | +X% Chance for Dust Devils to Cast Twice +X% Chance for Earthquakes to Cast Twice +X% Earthquake Duration |
| Wasteland Innovation Wasteland Innovation Wasteland Innovation |
Helms Chest Armor Gloves Pants Boots Shields Amulets |
+X% Ground Stomp Size +X% Leap Slam Size +X% Dust Devil Size |
| Weapon Attunement — Barbarian Weapon Attunement — Barbarian Weapon Attunement — Barbarian |
Rings Amulets |
•X% Basic Resource Generation +X% Resource Generation with Two-Handed Bludgeoning Weapons +X% Resource Generation with Dual-Wielded Weapons +X% Resource Generation with Two-Handed Slashing Weapons |
| Weapon Augments Weapon Augments Weapon Augments |
Weapons | +X% Chance for Mighty Throw to Deal Double Damage +X% Chance for Steel Grasp to Deal Double Damage +X% Chance for Death Blow to Deal Double Damage +X% Chance for Iron Maelstrom to Hit Twice |
| Weapon Mastery Efficiency Weapon Mastery Efficiency Weapon Mastery Efficiency |
Rings Amulets |
•X% Weapon Mastery Cooldown Reduction •X% Death Blow Cooldown Reduction •X% Rupture Cooldown Reduction •X% Steel Grasp Cooldown Reduction |
Druid Tempering Manuals:
| Tempering Manual | Item Type | Affix |
| Companion Efficiency Companion Efficiency Companion Efficiency |
Rings Amulets |
•X% Companion Cooldown Reduction •X% Wolves Cooldown Reduction •X% Poison Creeper Cooldown Reduction •X% Ravens Cooldown Reduction |
| Companion Finesse Companion Finesse Companion Finesse |
Weapons Gloves Rings Amulets |
+X% Companion Damage +X% Wolves Damage +X% Poison Creeper Damage +X% Ravens Damage |
| Companion Innovation Companion Innovation Companion Innovation |
Helms Chest Armor Gloves Pants Boots Shields Amulets |
+X% Wolves Attack Speed +X% Ravens Attack Speed +X% Poison Creeper Duration +X% Ravens Size |
| Druid Invigoration Druid Invigoration |
Rings Amulets |
•Casting Wrath Skills Restores +X Primary Resource •Casting Ultimate Skills Restores +X Primary Resource +X to Abundance +X to Clarity |
| Druid Motion Druid Motion Druid Motion |
Boots Amulets |
+X% Movement Speed •X% Trample Cooldown Reduction +X to Digitigrade Gait |
| Earth Augments Earth Augments Earth Augments |
Weapons | +X% Chance for Earth Spike Projectiles to Cast Twice +X% Chance for Landslide Projectiles to Cast Twice +X% Chance for Boulder Projectiles to Cast Twice +X% Petrify Duration |
| Earth Finesse Earth Finesse Earth Finesse |
Weapons Gloves Rings Amulets |
+X% Earth Damage +X% Earth Lucky Hit Chance +X% Earth Critical Strike Chance +X% Earth Overpower Damage +X% Boulder Damage |
| Nature Magic Wall Nature Magic Wall Nature Magic Wall |
Helms Chest Armor Pants Shields Amulets |
•X% Cyclone Armor Cooldown Reduction •X% Earthen Bulwark Cooldown Reduction +X% Cyclone Armor Size +X% Earthen Bulwark Duration |
| Shapeshifting Endurance Shapeshifting Endurance Shapeshifting Endurance |
Helms Chest Armor Pants Shields Amulets |
•X% Blood Howl Cooldown Reduction •X% Debilitating Roar Cooldown Reduction +X% Debilitating Roar Duration +X to Nature's Resolve |
| Shapeshifting Finesse Shapeshifting Finesse Shapeshifting Finesse |
Weapons Gloves Rings Amulets |
+X% Werewolf Attack Speed +X% Rabies Damage +X% Trample Damage +X% Lacerate Damage +X% Werewolf Critical Strike Chance +X% Werebear Overpower Damage |
| Storm Augments Storm Augments Storm Augments |
Weapons | +X% Chance for Wind Shear Projectiles to Cast Twice +X% Chance for Tornado Projectiles to Cast Twice +X% Hurricane Size +X% Lightning Storm Duration +X% Hurricane Duration |
| Storm Finesse Storm Finesse Storm Finesse |
Weapons Gloves Rings Amulets |
+X% Storm Damage +X% Hurricane Damage +X% Cataclysm Damage +X% Lightning Bolt Damage +X% Storm Critical Strike Chance |
| Werebear Augments Werebear Augments Werebear Augments |
Weapons | +X% Maul Size +X% Pulverize Size +X% Grizzly Rage Duration |
| Werewolf Augments Werewolf Augments Werewolf Augments |
Weapons | •X% Shred Critical Strike Chance +X% Rabies Duration +X% Lacerate Duration |
| Wrath Efficiency Wrath Efficiency Wrath Efficiency |
Rings Amulets |
X% Hurricane Cooldown Reduction X% Boulder Cooldown Reduction X% Rabies Cooldown Reduction |
Necromancer Tempering Manuals:
| Tempering Manual | Item Type | Affix |
| Blood Augments Blood Augments Blood Augments |
Weapons | +X% Hemorrhage Size +X% Blood Surge Size +X% Blood Lance Duration |
| Blood Endurance Blood Endurance Blood Endurance |
Helms Chest Armor Pants Shields Amulets |
+X% Chance for Hemorrhage to Form Blood Orbs +X% Blood Orb Healing +X% Blood Mist Duration •X% Blood Mist Cooldown Reduction |
| Blood Finesse Blood Finesse Blood Finesse |
Weapons Gloves Rings Amulets |
+X% Blood Attack Speed +X% Blood Damage +X% Blood Overpower Damage +X% Damage while Fortified |
| Bone Augments Bone Augments Bone Augments |
Weapons | +X% Chance for Bone Splinters Projectiles to Cast Twice +X% Chance for Bone Spear Projectiles to Cast Twice +X% Bone Spirit Size +X% Bone Storm Duration |
| Bone Finesse Bone Finesse Bone Finesse |
Weapons Gloves Rings Amulets |
+X% Bone Damage +X% Bone Critical Strike Chance +X% Bone Critical Strike Damage +X% Bone Spirit Damage |
| Necromancer Efficiency Necromancer Efficiency Necromancer Efficiency |
Rings Amulets |
•X% Ultimate Cooldown Reduction •X% Golem Cooldown Reduction •X% Bone Spirit Cooldown Reduction +X to Rapid Ossification |
| Necromancer Invigoration Necromancer Invigoration Necromancer Invigoration |
Rings Amulets |
+X% Chance for Projectiles to Cast Twice •Casting Macabre Skills Restores +X Primary Resource •Casting Ultimate Skills Restores +X Primary Resource |
| Necromancer Motion Necromancer Motion Necromancer Motion |
Boots Amulets |
+X% Movement Speed +X% Chance for Blood Mist Projectiles to Cast Twice +X to Death's Approach |
| Profane Cage Profane Cage Profane Cage |
Helms Chest Armor Pants Shields Amulets |
+X% Blight Effect +X% Corpse Tendrils Duration +X% Corpse Tendrils Size +X to Crippling Darkness |
| Profane Finesse Profane Finesse Profane Finesse |
Helms Chest Armor Pants Shields Amulets |
+X% Damage to Enemies Affected by Curse Skills +X% Macabre Damage +X% Iron Maiden Damage +X% Corpse Tendrils Damage |
| Profane Innovation Profane Innovation Profane Innovation |
Helms Chest Armor Gloves Pants Boots Shields Amulets |
+X% Corpse Explosion Size +X% Corpse Tendrils Size +X% Iron Maiden Size +X% Decrepify Size +X% Curse Duration |
| Shadow Augments - Decay Shadow Augments - Decay Shadow Augments - Decay |
Weapons | +X% Chance for Blight Projectiles to Cast Twice +X% Decompose Size +X% Blight Size |
| Shadow Augments - Execution Shadow Augments - Execution Shadow Augments - Execution |
Weapons | +X% Chance for Sever Projectiles to Cast Twice +X% Reap Duration |
| Shadow Finesse Shadow Finesse Shadow Finesse |
Weapons Gloves Rings Amulets |
+X% Shadow Damage Over Time +X% Darkness Damage +X% Desecrated Ground Damage +X% Corpse Explosion Damage |
| Summoning Augments Summoning Augments Summoning Augments |
Weapons | +X% Minion Attack Speed +X% Chance for Projectiles to Cast Twice +X% Skeleton Priest Effect Duration |
| Summoning Finesse Summoning Finesse Summoning Finesse |
Weapons Gloves Rings Amulets |
+X% Summoning Damage +X% Skeletal Mages Damage +X% Golems Damage |
| Thorn Army Thorn Army Thorn Army |
Helms Chest Armor Gloves Pants Boots Shields Amulets |
+X% Thorns while Fortified •Minions Inherit +X% of Your Thorns •Skeletal Warriors Inherit +X% of Your Thorns •Skeletal Mages Inherit +X% of Your Thorns •Golems Inherit +X% of Your Thorns |
| Weapon Attunement - Necromancer Weapon Attunement - Necromancer Weapon Attunement - Necromancer |
Rings Amulets |
•X% Basic Resource Generation +X% Resource Generation with Scythes +X% Resource Generation with Shields |
Rogue Tempering Manuals:
Sorcerer Tempering Manuals:
F.A.Q. - Diablo 4 Tempering & Masterworking
1. What is Tempering in Diablo 4?
Tempering is the first part of the new crafting system, used to add 2 new affixes to almost each type of item.
2. What type of items can be Tempered?
Aside from Unique and Uber Unique items, everything else can be Tempered.
3. What materials are needed to Temper items in D4?
To Temper an item, you will need the Tempering Manual unlocked and one of each tier of the item type material. For example, Tempering Weapons will require Iron Chunks, Veiled Crystal, and Baleful Fragments.
4. What is a Tempering Manual in Diablo IV?
Tempering Manuals are used to unlock new affix categories that can be added through Tempering.
5. Can you reroll Tempered affixes?
After adding both Tempered affixes, you can reroll them for a maximum of 5 times.
6. What is Masterworking in Diablo 4?
The Masterworking feature replaced the old upgrade system, replacing the 5 upgrades with a 12 rank structure.
7. How do you unlock Masterworking?
Masterworking doesn't need to be unlocked. The materials needed, however, are only obtainable from The Pit.
8. How do you Masterwork items?
You can masterwork items by simply going to the Blacksmith.
9. What types of items can be Masterworked in Diablo 4?
Every type of item can be Masterworked in Diablo 4.
Update Log
14.08.2024 - Updated all the information in the guide to match Season 5.
14.06.2024 - General information update, including the masterwork materials needed for each rank.
08.05.2024 - Updated all the information in the guide to match the new pre-Season 4 information.
Final Thoughts
In conclusion, the world of Diablo 4 is filled with constant changes and upgrades, and you have to be ready for them. By following our guide, you'll be well-prepared to start creating the perfect items that will make you one of the best demon slayers in the world of Sanctuary.
If this looks time-consuming or too hard, considering the amount of materials needed, why not check our Diablo 4 boosting services and let professional boosters take care of this grinding for you quickly and efficiently?
